


15
Introduction
Maintenance and
Troubleshooting
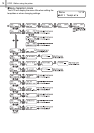
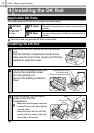
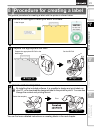
STEP
1
Introduction
STEP
2
STEP
3
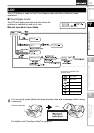
Before using the printer
Using only this printer (No PC)
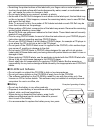
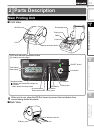
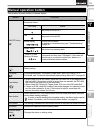
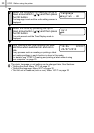
The function of each button is shown below:
Name Function
ON/OFF button
()
Turns the printer ON or OFF. The button also lights up or blinks depending on
the printer status.
Print button
()
Starts printing.
Cut button
()
Cuts the printed label. This button is used when "Auto Cut" is set to "OFF".
For details, see "Cut the roll automatically when printing: Menu 8/12" on page 32.
Feed button
()
• When using DK Die-cut Labels: feeds the DK Label Roll to the beginning of
the first label. If this button is held for more than one second, the DK Label
Roll is fed to the beginning of the next label.
• When using DK Continuous Tapes: feeds 25.4 mm of the DK Label Roll.
• If there is no DK Label Roll installed, the mode changes to a cleaning mode
and the roller rotates for 8 mm. If this button is held for more than one
second, the roller rotates for 100 mm.
Menu button
Switch between the Time Display mode (normal mode) and Menu Selection
mode (when making settings).
In order to avoid changing the template setting, the Menu button can be
locked. For details, see "Locking the Menu button" on page 34.
ESC button The setting is canceled and the screen returns to the previous mode or screen.
OK button Accepts the selected mode or setting value.
Up/down arrow
button
(/)
Changes the menu or setting value.
Manual operation button
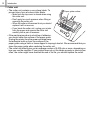
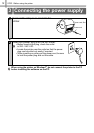
LED lamp Status
OFF
The power is turned OFF.
ON
The power is turned ON.
Blinks rapidly
An error has occurred.
For details on troubleshooting, see "Troubleshooting"
on page 42.
Blinks slowly
The printer is processing data.
Turns OFF after
blinking 10 times
A system error has occurred. Turn the printer OFF, wait
30 seconds and then turn it ON again. If this does not
clear the error you should contact your dealer or a
Brother authorised service centre.