


Maintenance and
Troubleshooting
STEP
1
STEP
2
STEP
3
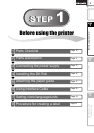
Before using the printer
Using only this printer (No PC)
Introduction ••••••••••••••••••••••••••••••••••••••••••••••••••••••••••••••••••••• 1
Manuals ••••••••••••••••••••••••••••••••••••••••••••••••••••••••••••••••••••••••••••••••••• 2
Symbols Used in this Manual ••••••••••••••••••••••••••••••••••••••••••••••••••••••••• 2
Safety Precautions •••••••••••••••••••••••••••••••••••••••••••••••••••••••••••••••••••••• 3
General Precautions •••••••••••••••••••••••••••••••••••••••••••••••••••••••••••••••••••• 6
Before using the printer••••••••••••••••••••••••••••••••••••••• 9
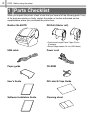
Parts Checklist ••••••••••••••••••••••••••••••••••••••••••••••••••••••••••••••••• 10
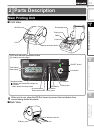
Parts Description••••••••••••••••••••••••••••••••••••••••••••••••••••••••••••••• 11
Main Printing Unit•••••••••••••••••••••••••••••••••••••••••••••••••••••••••••••••••••••••• 11
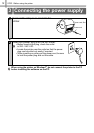
Connecting the power supply ••••••••••••••••••••••••••••••••••••••••••••••• 12
LCD •••••••••••••••••••••••••••••••••••••••••••••••••••••••••••••••••••••••••••••••••••••••• 13
Manual operation button ••••••••••••••••••••••••••••••••••••••••••••••••••••••••••••••• 15
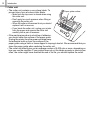
Installing the DK Roll•••••••••••••••••••••••••••••••••••••••••••••••••••••••••• 16
Applicable DK Rolls••••••••••••••••••••••••••••••••••••••••••••••••••••••••••••••••••••• 16
Installing the DK Roll•••••••••••••••••••••••••••••••••••••••••••••••••••••••••••••••••••• 16
Attaching the paper guide•••••••••••••••••••••••••••••••••••••••••••••••••••• 17
Using Interface Cable••••••••••••••••••••••••••••••••••••••••••••••••••••••••• 18
Setting clock/language/units••••••••••••••••••••••••••••••••••••••••••••••••• 19
Procedure for creating a label••••••••••••••••••••••••••••••••••••••••••••••• 21
Creating and printing a label without using
your computer•••••••••••••••••••••••••••••••••••••••••••••••••• 23
Creating a label •••••••••••••••••••••••••••••••••••••••••••••••••••••••••••••••• 24
1. Selecting a template ••••••••••••••••••••••••••••••••••••••••••••••••••••••••••••••••• 24
2. Printing a label•••••••••••••••••••••••••••••••••••••••••••••••••••••••••••••••••••••••• 25
Other convenient functions •••••••••••••••••••••••••••••••••••••••••••••••••• 26
Editing a template: Menu 1/12 •••••••••••••••••••••••••••••••••••••••••••••••••••••••• 26
Changing the date used for templates: Menu 2/12 ••••••••••••••••••••••••••••••• 27
Preview the label content before printing: Menu 3/12 •••••••••••••••••••••••••••• 28
Specifying the number of copies: Menu 4/12 •••••••••••••••••••••••••••••••••••••• 29
Printing labels with label numbers: Menu 5/12 •••••••••••••••••••••••••••••••••••• 29
Printing a list of templates: Menu 6/12 •••••••••••••••••••••••••••••••••••••••••••••• 31
Setting the clock: Menu 7/12 •••••••••••••••••••••••••••••••••••••••••••••••••••••••••• 31
Cut the roll automatically when printing: Menu 8/12 •••••••••••••••••••••••••••••• 32
Setting the language: Menu 9/12••••••••••••••••••••••••••••••••••••••••••••••••••••• 32
Set the unit of measure (inch or mm): Menu 10/12 ••••••••••••••••••••••••••••••• 33
Adjusting the contrast of LCD: Menu 11/12 •••••••••••••••••••••••••••••••••••••••• 33
Hiding/showing the preset templates: Menu 12/12 ••••••••••••••••••••••••••••••• 34
Locking the Menu button••••••••••••••••••••••••••••••••••••••••••••••••••••••••••••••• 34
Uploading templates/messages from your computer••••••••••••••••••••••••••••• 34
Concerning the download of message •••••••••••••••••••••••••••••••••••••••••••••• 34
Table of Contents
STEP 1
STEP 1
STEP
2
STEP
2