


17
Introduction
Maintenance and
Troubleshooting
STEP
1
Introduction
STEP
2
STEP
3
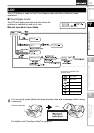
Before using the printer
Using only this printer (No PC)
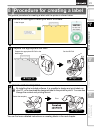
The printer contains a paper guide which can hold up to 10 individual label sheets.
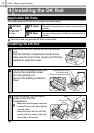
4
Check that the roll release lever
is in the up position.
Thread the end of the DK Roll
into the slot immediately in front
of the cutter.
When unable to thread the end of the
DK Roll fully into the slot, thread it as
far as possible. Lower the roll release
lever and close the cover, then press
the Feed button () to set the roll.
5
Push down the roll release lever and close the
DK Roll cover.
1
Attach the paper guide to the
front of the printer as shown
on the right.
You will need to remove the
paper guide if you wish to print
and cut more than 10 labels at a
time.
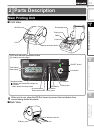
Roll release lever
Printing unit
Cutter
Attaching the paper guide
5
Paper guide