


TeraStation User Manual 11
1 Power Button
Power ON/OFF: Press and hold the Power Button for 3
seconds until it beeps.
Note: To power on, connect the AC cable and wait for 10
seconds. Then press the Power Button.
2 Info LED
If there is a message about the current status, the amber info
LED is illuminated. Check the LCD display for current status.
3 Error LED
The red error LED is illuminated when an error occurs. Check
the LCD display for more information.
4 LAN1 LED
When the LAN Port 1 is connected to a network, it is
illuminated in green (the light next to the LAN Port 1 will be
illuminated as well).
5 LAN2 LED
When the LAN Port 2 is connected to a network, it is
illuminated in green (the light next to the LAN Port 2 will be
illuminated as well).
6 LCD Display
Displays the status of the TeraStation.
7 Display Button
Switches between the dierent display modes.
8 Function Button
Use this button to perform the following operations:
• DirectCopy
• Removal of USB devices
• Rebuild RAID after replacing hard drives
9 Drive Lock
Open the front panel with the key to replace hard drives or
press the Reset Button.
10 Reset Button
With the TeraStation powered on, hold down this button
until it beeps (about 5 seconds) to reset the TeraStation’s IP
address and password to the factory defaults. The password
will not be reset if this functionality has been disabled from
within the Web Admin interface.
Note: To access the TS-RXL series’ reset button, insert the tip
of an unfolded paper clip.
11 Status LEDs 1 - 4
LEDs 1 through 4 will be illuminated in green when the
corresponding hard drives are accessed. If an error occurs on
a hard drive, the corresponding LED will be illuminated or
ash in red or amber.
12 Factory Use Only
TS-XEL TeraStations do not have this port.
13 UPS Port
Connect a UPS (Uninterruptible Power Supply).
TS-XEL TeraStations do not have this port.
14 USB Connector (USB 2.0/1.1 Series A)
Compatible Bualo USB hard drives, USB ash drives,
and digital cameras can be connected. USB hubs are not
supported.
15 LAN Port 1
Connect to a router, hub, or switch on your Ethernet network.
16 LAN Port 2
Use this second Ethernet port for redundancy or backup. For
backup, a second TeraStation may be connected directly.
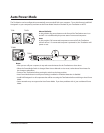
17 Power Mode Switch
Switches between AUTO and MANUAL power modes (page
12).
18 Power Connector
Use the included AC cable to connect to an UPS, surge
protector, or outlet.
19 Fan
Do not block the fan when installing the unit.
20 Anti-Theft Security Slot
You can also secure it using an o-the-shelf wire lock.
21 UID Button
The blue LED next to the UID button will be illuminated or
turned o every time you push this button on the front or
back.