10
1
2
3
4
5
6
7
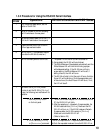
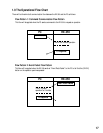
With the shutter speed switch, set the
shutter of the
RE-350.
Set an
ID number for this RE-350 using
the
DIP switches on the rear panel.
Set communication speed for
RS-232C I/F
with the DIP switches on the rear panel.
Properly connect the
RE-350 to the PC
with an approved serial cable.
Turn on the PC. (This operation may be
done after the RE-350 is turned on.)
Turn on the main power of the RE-350.
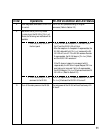
Set the RE-350 to [O
N
-L
INE
] Mode.
In order to put the RE-350 in [O
N
-L
INE
]
Mode, the following two methods will be
available:
1. Push the {RS-232} button
on the front panel.
2. The PC sends an [O
N
-L
INE
]
or [N
OTIFICATION
] command.
1. The power LED on the RE-350 will be turned on
2. Automatically the RE-350 will be initialized.
3. The White Balance will be adjusted automatically and the
White Balance LED will blink while finding a proper
white balanced setting. If the RE-350 can not find a
proper setting, the White Balance LED will be off, if
setting is found, the LED will be on.
4. The RE-350 will start to find the point of focus, the Auto
Focus LED will be blinking. Once the appropriate point
of focus is found, the Auto Focus LED will be on, if not,
the LED will be off.
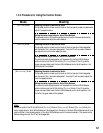
1. The RE-350 will send Request On Line event data to the
PC, the RS-232 LED will blink.
2. After the reception of <Accepted> E-response data, the
RE-350's status shifts to [O
N
-L
INE
] Mode and the RS-
232 LED
will turn on. If the RE-350 receives <Denied>
E-response data, the RE-350 remains in [O
FF
-L
INE
]
Mode and turns the RS-232 LED off.
(Refer to Section 2.5)
The RE-350 responds with C-response data and its status
shifts to the requested mode and turns the RS-232 LED on.
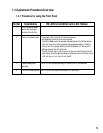
1.3.2 Procedure for Using the RS-232C Serial Interface
Order
RE-350's Condition and LED StatusOperations


