


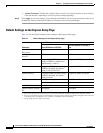

5-6
Cisco Aironet 1300 Series Outdoor Access Point/Bridge Hardware Installation Guide
OL-5048-02
Chapter 5 Configuring the Access Point/Bridge for the First Time
Assigning Basic Settings
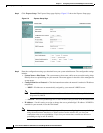
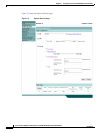
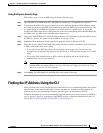
Step 4 Click Express Setup. The Express Setup page displays. Figure 5-2 shows the Express Setup page.
Figure 5-2 Express Setup Page
Step 5 Enter the configuration settings you obtained from your system administrator. The configurable settings
include:
• System Name or Host Name—The system name or host name, while not an essential setting, helps
identify the access point/bridge on your network. The name appears in the titles of the management
system pages.
• Configuration Server Protocol—Click the button that matches the network’s method of IP address
assignment.
–
DHCP—IP addresses are automatically assigned by your network’s DHCP server.
Note When DHCP is enabled, the IP Address, Subnet Mask, and Default Gateway fields indicate
Negotiated by DHCP.
–
Static IP—The access point/bridge uses a static IP address that you enter in the IP address field.
• IP Address—Use this setting to assign or change the access point/bridge’s IP address. If DHCP is
enabled for your network, leave this field blank.
Note If the access point/bridge’s IP address changes while you are configuring the access point/bridge
using the web-browser interface or a Telnet session over the wired LAN, you lose your
connection to the access point/bridge. If you lose your connection, reconnect to the access
point/bridge using its new IP address.