


6-20
Catalyst 2940 Switch Software Configuration Guide
78-15507-02
Chapter 6 Administering the Switch
Managing the MAC Address Table
Configuring a Login Banner
You can configure a login banner to be displayed on all connected terminals. This banner appears after
the MOTD banner and before the login prompt.
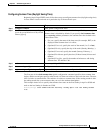
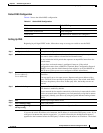
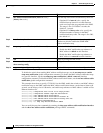
Beginning in privileged EXEC mode, follow these steps to configure a login banner:
To delete the login banner, use the no banner login global configuration command.
This example shows how to configure a login banner for the switch by using the dollar sign ($) symbol
as the beginning and ending delimiter:
Switch(config)# banner login $
Access for authorized users only. Please enter your username and password.
$
Switch(config)#
Managing the MAC Address Table
The MAC address table contains address information that the switch uses to forward traffic between
ports. All MAC addresses in the address table are associated with one or more ports. The address table
includes these types of addresses:
• Dynamic address: a source MAC address that the switch learns and then ages when it is not in use.
• Static address: a manually entered unicast or multicast address that does not age and that is not lost
when the switch resets.
The address table lists the destination MAC address, the associated VLAN ID, and port number
associated with the address.
Note For complete syntax and usage information for the commands used in this section, refer to the command
reference for this release.
Command Purpose
Step 1
configure terminal Enter global configuration mode.
Step 2
banner login c message c Specify the login message.
For c, enter the delimiting character of your choice, for example, a pound
sign (#), and press the Return key. The delimiting character signifies the
beginning and end of the banner text. Characters after the ending delimiter
are discarded.
For message, enter a login message up to 255 characters. You cannot use the
delimiting character in the message.
Step 3
end Return to privileged EXEC mode.
Step 4
show running-config Verify your entries.
Step 5
copy running-config startup-config (Optional) Save your entries in the configuration file.