


3-2
Cisco Active Network Abstraction 3.6.6 MPLS User Guide
OL-19192-01
Chapter 3 Managing VPN Business Configurations
Creating a VPN
Step 4 In the Create VPN dialog box, enter the following:
• Name—Enter a unique name for the new VPN.
Note VPN business element names are case sensitive.
• Icon—If you want to use a custom icon for the VPN, click the button next to the Icon field and
navigate to the icon file.
Note If a path is not specified to an icon the default VPN icon is used (for more information about
icons see Table 1-3 on page 1-7).
• Description—(optional) An additional VPN description.
Step 5 Click OK.
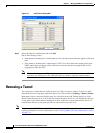
The new VPN is added to the VPN list in the Add VPN to <Root> dialog box.
For more information about loading the newly created VPN in the service view map, see Adding a VPN
to a Map, page 2-1.