


3-7
Cisco UCS C24 Server Installation and Service Guide
OL-26647-01z
Chapter 3 Maintaining the Server
Preparing for Server Component Installation
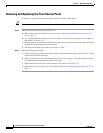
Removing and Replacing the Server Top Cover
To remove or replace the top cover of the server, follow these steps:
Tip You do not have to remove the cover to replace hard drives or power supplies.
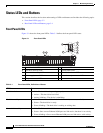
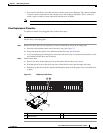
Step 1 Remove the top cover (see Figure 3-3).
a. Loosen the two captive thumbscrews that secure the rear edge of the top cover to the chassis.
b. Push the top cover toward the server rear about one-half inch (1.27 cm), until it stops.
c. Lift the top cover straight up from the server and set it aside.
Step 2 Replace the top cover:
a. Place the cover on top of the server about one-half inch (1.27 cm) behind the lip of the front chassis
panel. The cover should sit flat.
Note The rear of the cover has a wrap-around flanged edge that must be correctly aligned with the
chassis rear edge when sliding the cover forward.
b. Slide the top cover toward the front chassis panel until it stops.
c. Tighten the two captive thumbscrews that secure the rear edge of the cover to the chassis.
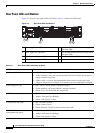
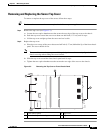
Figure 3-3 Removing the Top Cover or Front Chassis Panel
1 Front chassis panel 3 Top cover
2 Front chassis panel securing screws (three) 4 Top cover thumbscrews (two)
333249
1
3
4
2