


3-47
Cisco UCS C24 Server Installation and Service Guide
OL-26647-01z
Chapter 3 Maintaining the Server
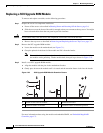
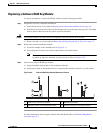
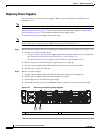
Installing or Replacing Server Components
Step 1 Verify that a TPM is now installed and enabled in the server:
a. Either attach a VGA monitor and USB keyboard to the server, or log in remotely to the CIMC
interface of the server and open a virtual KVM console window.
b. Reboot the server.
c. Watch during bootup for the F2 prompt, and then press F2 to enter BIOS setup.
d. Log in to the BIOS Setup utility with your BIOS Administrator password.
Note You must be logged in as the BIOS administrator to perform this procedure. If you have not done
so already, set a BIOS administrator password on the Security tab of the BIOS Setup utility.
e. Select the Advanced tab.
f. On the Advanced tab, select Trusted Computing to open the TPM Security Device Configuration
screen.
g. Verify that TPM SUPPORT is Enabled. If it is not, set TPM SUPPORT to Enabled.
h. Press Escape to return to the BIOS Setup utility Advanced tab.
Step 2 Enable the Intel Trusted Execution Technology (TXT) feature:
a. On the Advanced tab, select Intel TXT(LT-SX) Configuration to open the Intel TXT(LT-SX)
Hardware Support screen.
Note The Intel Trusted Execution Technology feature can be enabled only when the server has a TPM
installed on the TPM header.
b. Set TXT Support to Enabled.
Step 3 On the same screen, verify that the Intel Virtualization Technology (VT) and the Intel VT for Directed
I/O (VT-d) features are enabled (the factory default).
a. On the Intel TXT(LT-SX) Hardware Support screen, verify that VT-d Support and VT Support are
both listed as Enabled.
–
If they are already enabled, skip to Step 4.
–
If VT-d Support and VT Support are not enabled, continue with the next steps to enable them.
b. Press Escape to return to the BIOS Setup utility Advanced tab.
c. On the Advanced tab, select Processor Configuration to open the Processor Configuration screen.
d. Set Intel (R) VT and Intel (R) VT-d to Enabled.
Step 4 Press F10 to save your changes and exit the BIOS Setup utility.
Step 5 Verify that the Intel TXT, VT, and VT-d features are enabled:
a. Reboot the server.
b. Watch during bootup for the F2 prompt, and then press F2 to enter BIOS setup.
c. Select the Advanced tab.
d. Select Intel TXT(LT-SX) Configuration and verify that TXT Support, VT-d Support, and VT
Support are Enabled.