3-8
Cisco UCS C24 Server Installation and Service Guide
OL-26647-01
Chapter 3 Maintaining the Server
Preparing for Server Component Installation
Removing and Replacing the Front Chassis Panel
To remove or replace the front chassis panel of the server, follow these steps:
Tip Remove this panel only if you are instructed to do so in a procedure in this book.
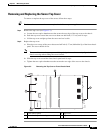
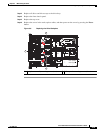
Step 1 Remove the front chassis panel (see Figure 3-3):
a. Remove the top cover from the server as described in Removing and Replacing the Server Top
Cover, page 3-7.
b. Use a #2 Phillips-head screwdriver to remove the three screws that secure the front chassis panel to
the chassis (see
Figure 3-3).
c. Push the panel forward about 1/4-inch, until it stops. The wrap-around front edge of the panel must
become free from the front edge of the chassis.
d. Lift the panel straight up from the server and set it aside.
Step 2 Replace the front chassis panel:
a. Set the front chassis panel back in place, with its wrap-around front edge about 1/4 inch (1.27 cm)
forward of the chassis front edge.
b. Slide the front chassis panel toward the server rear to lock it in place. The wrap-around front edge
of the panel must wrap around the chassis front edge.
c. Replace the three screws that secure the panel to the chassis (see Figure 3-3).
d. Replace the top cover to the server as described in Removing and Replacing the Server Top Cover,
page 3-7.


