


Chapter 3 Disassembly and Maintenance
3-5. Disassembly, Reassembly and Lubrication
3-29 CL-S700/CL-S703/CL-S700R
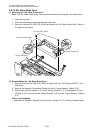
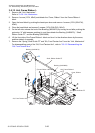
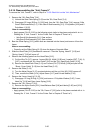
3-5-13. Disassembling the “SA, Front Tension Arm”
To remove the “SA, Front Tension Arm”, refer to "3-5-12. Unit, Frame Ribbon L.
1. Release the lock of the right side Bushing (24400670) [4-4].
2. Remove the Bushing (24400670) [4-4], “Spring, Shaft Guide FM” [4-5], “Washer, Shaft Guide
FM” [4-6], “Shaft, Ribbon Guide FM” [4-3] and Bushing (24400680) [4-2] from the “SA, Front
Tension” [4-1].
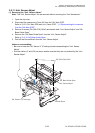
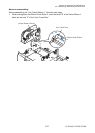
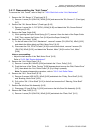
3-5-14. Disassembling the “SA, Frame Ribbon R”
To remove the “SA, Frame Ribbon R”, refer to Step 6 in "3-5-9. Each Unit on the “Unit, Mechanism"
1. Pull out 2 “Holder, Ribbon Shaft” [6-1] upwardly after releasing their locks.
2. Remove the “Knob, Ribbon Unit” [6-2] and “Plate, Ribbon Frame” [6-4] from the “Frame,
Ribbon R” [6-3], after releasing their claws.
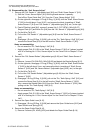
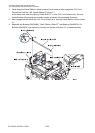
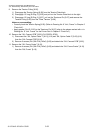
3-5-15. Disassembling the “Unit, Frame Rear”
To remove the “Unit, Frame Rear”, refer to Step 7 in "3-5-9. Each Unit on the “Unit, Mechanism".
1. Release the lock of the left side Bushing (24400670) [5-1].
2. Remove the Bushing (24400670) [5-1], Ribbon Guide Roller E [5-2] and Bushing (24400680)
[5-3] from the “SA, Frame Rear” [5-4].
3. Remove 1 screw (PH (SW+PW), M3x5) [5-11] and detach “SA, Plate Stopper Rear” [5-6].
Then, detach the Ribbon Guide block and the Rear Arm Spring [5-5].
4. Remove 4 screws (FT, M3x6) [5-12] and detach all other parts (Side Plate L [5-7], Side Plate R
[5-10], 4 Bushings (24400680) [5-3], 2 Ribbon Guide Rollers C [5-8] and Beam [5-9]).
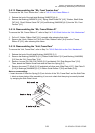
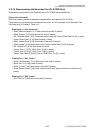
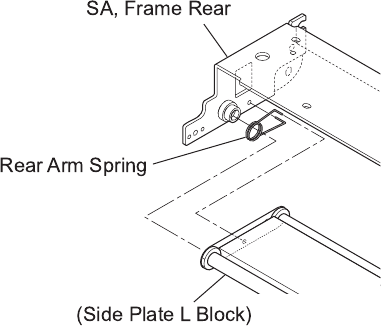
Note on reassembling:
• Insert the ends of Rear Arm Spring [5-5] into the hole of the “SA, Frame Rear” and the Side Plate
L block as shown below. After assembling it, be sure to check that the spring is correctly hooked
by swinging the Side Plate L block.