Chapter 3 Disassembly and Maintenance
3-5. Disassembly, Reassembly and Lubrication
CL-S700/CL-S703/CL-S700R 3-12
A
BH, M3x5
PHT (#2), M3x6
PHT (#2), M3x6
B
PH (SW+PW), M3x5
PH, M3x12
SA, Ope-pane PCB
SA, Ope-pane Plate
SA, Cover Open Sens
Guide, Top Cover
Cable, Ope-pane FFC
(Blue Tape)
Switch, Pause
Switch, Feed
Switch, Stop
Switch, Menu
Cover, Ope-Pane
Cover, LCD
Sheet, Ope-Pane
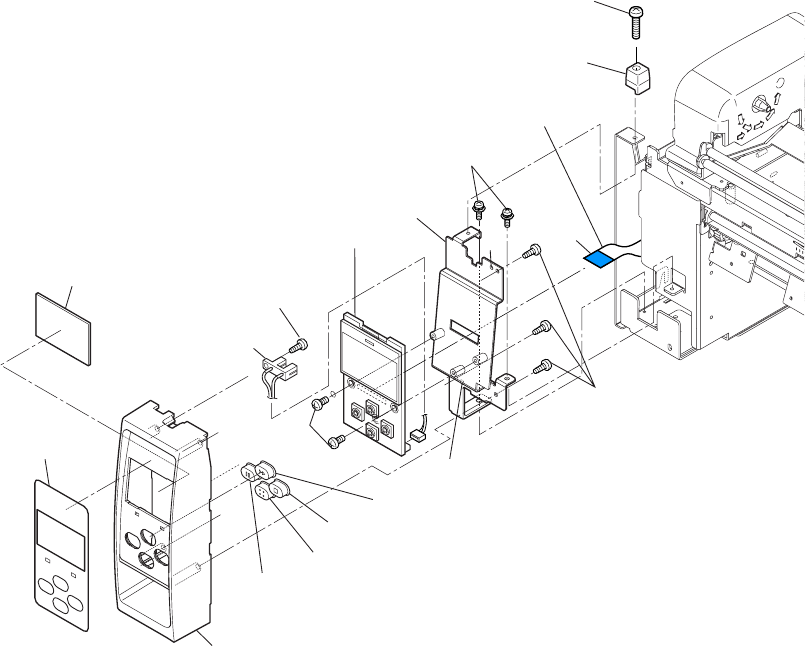
3-5-3. SA, Ope-pane PCB and SA, Cover Open Sens
1. Open the top cover.
2. Remove 1 screw (PH, M3x12) and detach the “Guide, Top Cover”.
3. Remove 2 screws (PH (SW+PW), M3x5) (1 screw for new type) and detach the Ope-pane
block frontward.
4. Disconnect the “Cable Ope-pane FFC” from the “SA, Ope-pane PCB”.
5. Remove 3 screws (PHT (#2), M3x6) and detach the “SA, Ope-pane Plate” (with the “SA,
Ope-pane PCB”) from the Ope-pane Cover block.
6. Remove 2 screws (BH, M3x5) and detach the “SA, Ope-pane PCB” from the “SA, Ope-pane
Plate”.
7. Disconnect the connector of “SA, Cover Open Sens” from the “SA, Ope-pane PCB”.
8. Remove 1 screw (PHT (#2), M3x6) and detach the “SA, Cover Open Sens” from the Ope-pane
Cover block.
9. Detach four switches (PAUSE, FEED, STOP and MENU).
10. Peel off the “Sheet Ope-Pane” from the “Cover Ope-Pane” and remove the “Cover LCD” from
the “Sheet Ope-Pane”.
Notes on reassembling:
• Assemble each switch in place.
• When assembling the “SA, Ope-pane Plate” in the Ope-pane Cover block, fit the holes “A” and
“B” to the protrusions.
• Insert the “Cable Ope-pane FFC” with its blue tape facing up.


