


87
Dane-Elec. All rights reserved 2010
my-Ditto User Manual
12 Installing Hard Disk Drives
my-Ditto comes with two bays, both of which accommodate a 3.5” SATA I/II hard disk drive.
With maximum capacity of up to 2 TB (3TB SATA III disks are not supported!)
The first bay is used to house the primary storage disk (HDD1), while the second bay’s hard
disk drive (HDD2) can be used either as a mirrored backup for the primary disk or as an
additional storage disk.
The following instructions guide you through the installation of a second hard disk drive. If
you want to replace the primary hard disk drive at any time with one that has a higher
capacity, simply repeat these same instructions.
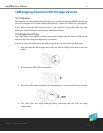
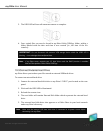
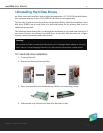
12.1 Hard disk drive installation
1. Turn my-Ditto off.
2. Remove the disk tray from my-Ditto.
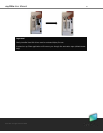
3. Place your hard disk drive inside the tray and fix it securely using screws.
4. Slide the disk tray with the hard disk drive back into its bay.
Warning!
Be sure that my-Ditto is turned off and the power cord is unplugged before adding or removing
disks. There is a risk of damaging the disks if my-Ditto remains connected to a power source.