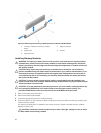
5. Align the memory module's edge connector with the alignment key on the memory module socket,
and insert the memory module in the socket.
NOTE: The memory module socket has an alignment key that allows you to install the memory
module in the socket in only one way.
6. Press down on the memory module with your thumbs to lock the memory module into the socket.
When the memory module is properly seated in the socket, the ejectors on the memory module
socket align with the ejectors on the other sockets that have memory modules installed.
7. Repeat step 3 through step 5 of this procedure to install the remaining memory modules.
8. Install the blade system board.
9. Install the blade in the sleeve.
10. (Optional) Press <F2> to enter the System Setup, and check the System Memory setting.
The system should have already changed the value to reflect the newly installed memory.
11. If the value is incorrect, one or more of the memory modules may not be installed properly. Check to
ensure that the memory modules are firmly seated in their sockets.
12. Run the system memory test in the system diagnostics.
Management Riser Card
The management riser card provides two card slots and offers the following features:
• Internal Dual SD interface — maintains a mirrored configuration using SD cards in both slots (labeled
as SD1 and vFlash/SD2) and provides redundancy.
NOTE: The SD card slot is on the left side of blade chassis and labeled as SD1.
• Single card operation — A single card in the SD1 card slot is supported, but does not offer
redundancy. A vFlash card can be installed in the vFlash card slot on the blade chassis. The vFlash card
provides persistent on-demand local storage and a custom deployment environment that allows
automation of server configuration, scripts, and imaging. For more information, see the iDRAC7
documentation at support.dell.com/manuals.
NOTE: The vFlash card slot is on the left side of blade chassis and labeled as vFlash/SD2.
Removing The Management Riser Card
CAUTION: Many repairs may only be done by a certified service technician. You should only
perform troubleshooting and simple repairs as authorized in your product documentation, or as
directed by the online or telephone service and support team. Damage due to servicing that is
not authorized by Dell is not covered by your warranty. Read and follow the safety instructions
that came with the product.
1. Remove the blade from the sleeve.
2. Remove the cards from the SD card and vFlash card slots.
3. Remove the mezzanine card/blank.
4. Remove the SSDs.
NOTE: If you are removing both SSDs, label them so you can replace them in their original
locations.
5. Remove the SSD backplane.
6. Remove the blade system board.
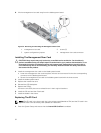
7. Remove the three screws from the management riser card.
51


