


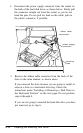

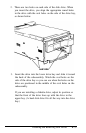

Installing a Disk Drive in the Horizontal Position
Before you perform the following steps, be sure that you have set
the jumpers on any hard disk drive(s) that you are installing or
that have been installed in your computer. (If not, see “Setting
the Hard Disk Drive Jumpers,” on page B-4, for instructions.)
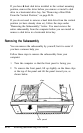
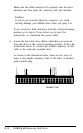
If you are adding a 3 ‘/z-inch diskette drive or hard disk drive,
you need to make sure that 5
‘/+inch
metal mounting frames are
attached to the drive so it fits properly in the drive bay. Epson
3
‘/z-inch
diskette drives and hard disk drives come with
mounting frames already installed. If your drive did not come
with frames installed, follow the instructions in the manual that
came with your drive to attach them.
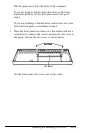
The figures in this section show a diskette drive, but you can use
the same instructions to install a hard disk drive.
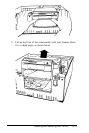
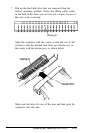
Follow these steps to install the disk drive:
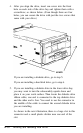
1.
If you are installing a 5
‘/+inch
diskette drive, turn the drive
so that the diskette release latch is above the diskette slot.
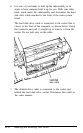
If you are installing a 3 ‘/z-inch diskette drive, turn the drive
so that the diskette release button is on the right and the
drive light is on the left.
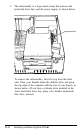
If you are installing a hard disk drive, turn the drive so that
the side with the components is facing down.
B-34 Installing and Removing Disk Drives