


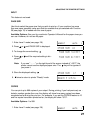

Level 2 Features
One of the following features appears in the display when you enter Level 2. Use the
and keys to scroll through the list until you see the feature that you need to use.
(To return to the printer "Ready" display, press repeatedly.)
TEST PRINT: Use this to print a test pattern.
MODE ASSIGN: Use this to select an emulation mode.
I/F CONFIG.: Use this to change the configuration of the serial and parallel channels.
RX-BUFFER SIZE: Use this to change the size of the printer’s data buffer.
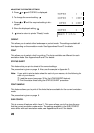
CH: If you are connecting your printer to more than one computer, use the CH feature
to allocate memory to each channel.
CH TIMEOUT: Use this to define the channel timeout. If no data is sent during the
specified time period, the printer switches to the other channel.
AUTO CONT.: If you switch Auto Continue on, the printer will continue printing when
certain types of error are detected.
P-CONFIG. SAVE: Use this to save all the current Level 2 settings. These settings will
take effect every time you switch the machine on.
FACTORY RESET: Use this to reset all Level 1 and 2 settings to the factory settings.
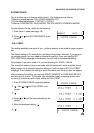
VERSION: Use this to check the version numbers of the printer control software and
fonts.
PAGE COUNTER: This counter only gives the total number of pages made by the
printer. For a count of the pages made by your machine, including faxes and computer
printouts, use the counter feature described in your fax machine’s Operator’s Manual.
STANDBY: Do not use this feature.
See Appendix E for a more detailed list of these features and their possible settings.
ADJUSTING THE PRINTER SETTINGS
22