


Pressure Systems, Inc. 98RK-1 & 9816 User’s Manual©
Page 129 www.PressureSystems.com
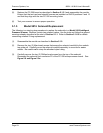
5.1.6.6 Module Rear Manifold O-Ring Replacement
If a leak is suspected at the module rear manifold:
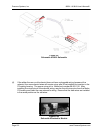
(1) Remove the module from the 98RK-1 Scanner Interface Rack by unscrewing the
locking rod (turn counterclockwise with a 5/64" Allen-head screwdriver) and slide the
entire module chassis out of the rack (as previously described in Section 5.1.2).
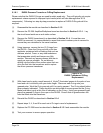
(2) Inspect the rear manifold O-rings and if any are suspect, carefully remove with tweezers.
(Do not scratch the manifold block, as this may induce additional leaks.)
(3) Clean the O-ring cup with a lint-free applicator moistened with a cleaning fluid such as
acetone, alcohol, Freon, or any other substance that evaporates quickly and leaves very
little residue. Remove any excess cleaner with supply air (dry) as soon as possible. Do
not blow air directly into the holes of the surface since that could drive the fluid into the
scanner.
For glued O-ring replacement
(4a) There are only two O-rings on this panel that are glued, the larger black ones. One is for
the purge port and the other surrounds a blanking pin. Using a glue syringe, line the O-
ring cup(s) with appropriate glue, such as 3M Scotch Grip 1357. Insert a new O-ring (PSI
part number 61-03-50120) and press it into the cup with your hand. Allow the glue to dry
for approximately 10-15 minutes. Clean any excess glue with appropriate cleaning
solvent, and dry. Be extremely careful not to allow any excess glue to cover the tubing
ports.
For non-glued (flared post) O-ring replacement
(4b) With clean hands, apply a small amount of Krytox
®
fluorinated grease to the palm of one
hand and rub it out evenly with your index finger. Place one of the new (red) O-rings onto
your greased palm. Work the O-ring around until it is evenly greased. There should be
no white area of excess grease on the O-ring. Make sure there is only a thin film of
lubrication on the O-ring. Using your greased finger, roll the greased O-ring over the
flared portion of the tubing connector and into the O-ring cup. Ensure that no grease
enters the hole that leads into a transducer.
For all
(5) Apply a very small amount of Krytox
®
fluorinated grease to the entire manifold, being
careful not to allow any excess grease into any tubing port.
(6) Slide the module back into the 98RK-1 Scanner Interface Rack and screw the locking
rod clockwise (using a 5/64" Allen-head screwdriver) until tight.
(7) Test the scanner to ensure proper operation.