


Connection and Configuration, cont’d
IPL T S Series • Connection and Configuration
3-4
IPL T S4
R
100
LINK
ACT
1
COM
TX
2
RX
RTS
CTS
3
TX
4
RX
RTS
CTS
1
2
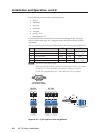
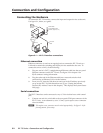
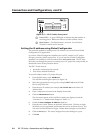
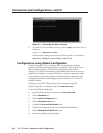
Figure 3-3 — IPL T S unit’s front panel
a
Power LED — A green LED lights to indicate that the interface is
receiving power. Blinks four times to confirm a Mode 4 reset.
b
Reset button — The Reset button is recessed. Use an Extron
Tweeker or similar tool to activate.
Setting the IP address using Global Configurator
The preferred method for setting a unit’s IP address is to use the Extron Global
Configurator (GC) application.
If you have Global Configurator installed on a local PC, and have a GC project
file open, proceed with the steps below. If you do not have Global Configurator
installed, it is available as a free download from www.extron.com. The GC help
file leads you through the process of creating a new GC project file, and provides an
illustrated version of the procedure below.
The IPL T S unit must be:
• physically connected to the network
• at its factory default IP address
To set an IP address with a GC project file open:
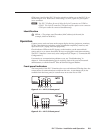
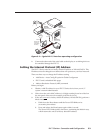
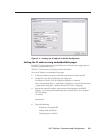
1. From the Edit menu, select Add Device.
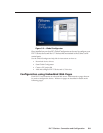
The Add Device dialog box opens (see figure 3-4).
2. Select the appropriate device type (for example, IPL T S4) in the IP Link
®
Device drop-down list.
3. Enter the new IP address (for example, 10.14.195.40) in the Name/IP
Address field.
4. Enter a unique device name in the Display Name field.
5. Click the Advanced >>> button.
The Advanced options of the Add Device dialog are displayed, and the
“Advanced >>>” button name changes to “Basic <<<”.
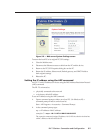
6. Enable the Auto Configure IP Address check box.
7. Enter the unit’s MAC address in the MAC Address field. The first six digits
(00-05-0A) are pre-populated, and identify this unit as an Extron device. You
only need to enter the final six digits. Dashes between digits are auto-filled.
8. Click the Set button. The Auto Configure Successful dialog box opens.
9. Click OK.