


Chapter 4 • Working with Quality Center Synchronizer
107
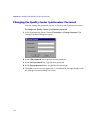
2 In the File name box, type the name of the backup file containing the data
you want to import. This file must be located in the backup directory on the
Synchronizer server. By default, this directory is <Quality Center
Synchronizer installation directory>\backup. For information on changing
this directory, see “Configuring the Server Options” on page 108.
3 Click the Submit button. A new link is created in the Links Grid based on
the settings defined in the XML file included in the .zip file. This link also
includes the imported identity mapping data.
Configuring the Quality Center Synchronizer Options
You can configure the Synchronizer client and server options. This section
includes the following topics:
➤ “Configuring the Client Options” on page 107
➤ “Configuring the Server Options” on page 108
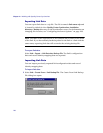
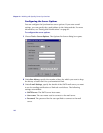
Configuring the Client Options
You can configure the options for a local Synchronizer client.
To configure the client options:
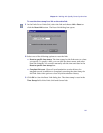
1 Choose Tools > Local Client Options. The Local Client Options dialog box
opens.
2 In the Number of runs to display box, type the number of runs you want to
display when viewing the task run history for a synchronization link.
3 Click OK.