


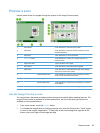
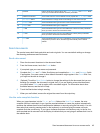
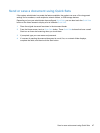
6 Scroll bar Use the Scroll bar to view and set up the cc:, bcc:, Message:, and File Name: fields.
Touch any of those fields and add the necessary information.
7 Address book buttons Touch these buttons to use the address book to populate the To:, cc:, or bcc: fields.
8 More Options button Touch this button to change certain e-mail settings for the current scan job.
9 File Name: field Touch this field and then type the name of the scanned document.
10 Subject: field Touch this field and then type a subject title.
11 cc: field Touch this field and then type the e-mail addresses of those secondary individuals
whom you want to receive the scanned document.
12 To: field Touch this field and then type the e-mail addresses of those primary individuals
whom you want to receive the scanned document.
13 From: field Touch this field and then type your e-mail address. If the system administrator has
configured the product to do so, this field might automatically insert a default
address.
Send documents
The product scans both black-and-white and color originals. You can use default settings or change
the scanning preferences and file formats.
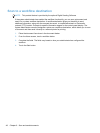
Send a document
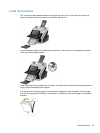
1. Place the document face down in the document feeder.
2. From the Home screen, touch the E-mail button.
3. If prompted, type your user name and password.
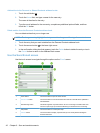
4. Complete the From: and To: fields. Scroll down and complete the cc:, bcc:, and Message: fields
if appropriate. Your user name or other default information might appear in the From: field. If so,
you might not be able to change it.
5. (Optional) Touch the More Options button to change the settings for the document that you are
sending (for example, the document’s original size). If you are sending a two-sided document,
you should select Sides and an option with a two-sided original. For information about other
available features, see the built-in Help.
6. Touch the Start button to begin sending.
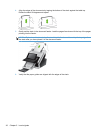
7. When you are finished, remove the original document from the output tray.
Use the auto-complete function
When you type characters into the To:, cc:, or From: fields on the Send E-mail screen, the auto-
complete function is activated. As you type the required address or name, the product automatically
searches the address book list and completes the address or name by using the first match. You can
then select that name by pressing enter on the keyboard, or continue typing the name until auto-
complete finds the correct entry. If you type a character that does not match any entry in the list, the
auto-complete text is removed from the display to indicate that you are typing an address that is not in
the address book.
Send a scanned document to one or more e-mails 43