


Configuring and Testing the Tape Library
L700 (CTL700) Installation and User’s Guide—527338-004
5-11
Verifying Configuration
11. When the choice is displayed, press the SELECT button to save the changes.
Press the MENU button to abort. The DRIVE CONFIG screen appears.
12. Continue these steps until the tape drives are configured.
13. To set other values, continue with the next subsection.
Verifying Configuration
When all the configuration entries have been completed, the operator panel notifies
you to press the RESET button if a change has been made that requires an IPL.
When the tape library becomes ready, go through the configuration screens to verify all
the information is complete.
Performing the Final Steps
When the tape library and all tape drives are configured, perform these final steps
before testing the tape library:
1. Power off the tape library.
2. Open the right side door.
For 9840 and 5259 Tape Drives:
a. Insert the single connector end of the Y cable into all drives.
b. Install the client Fibre Channel cables.
c. Check that all tape drive power switches are in the ON (1) position.
3. Power on the tape library. An initialization sequence (described next) begins.
Initialization Sequence
An IPL occurs when the tape library powers on or the RESET button is pressed. The
IPL process consists of functional firmware loading.
The MPC card directs the initialization process, which consists of the following:
•
Initialization and calibration of robotic mechanisms
•
Calibration of the vision system
•
Motion testing
•
Hand assembly testing
•
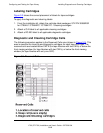
An audit of tape cartridges within the tape library
•
Audit of reserved cells
These steps are explained in the next sections.