


Configuring and Testing the Tape Library
L700 (CTL700) Installation and User’s Guide—527338-004
5-17
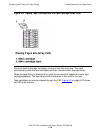
Running Diagnostic Tests
3. Check that there is a diagnostic cartridge in the reserved area.
4. From the Status screen, press the MENU button on the operator panel.
5. Use the down arrow button to select DIAGNOSTICS.
6. Press SELECT. The DIAGNOSTICS screen appears.
7. Use the down arrow button to select GET-PUT LOOP.
8. Press SELECT. The GET/PUT option screen appears.
9. Follow the screen directions to set the number of times for the test to run.
10. At the “ARE YOU SURE?” prompt, confirm that the tape library is in maintenance
mode (offline) before beginning the test. Confirm by pressing the SELECT button.
11. After this diagnostic test runs to completion, press MENU to return to the
DIAGNOSTIC menu.
Running the Mount-Dismount Loop Diagnostic Test
The Mount-Dismount loop diagnostic test validates the ability of the robot to load and
unload a cartridge to a tape drive. The robot:
•
Retrieves a diagnostic tape cartridge
•
Loads the tape cartridge into a tape drive
When the drive dismounts the cartridge, the robot:
•
Retrieves the tape cartridge
•
Places it back in its reserved cell
To run the Mount-Dismount diagnostic test:
1. Check that both the tape library and target drive are offline.
2. Check that the main access door is closed and the tape library menu is displayed.
3. Check that there is a diagnostic cartridge in the reserved area.
4. From the Status screen, press the MENU button. The Main menu appears.
5. Use the down arrow button to select DIAGNOSTICS.
6. Press the SELECT button. The DIAGANOSTICS screen appears.
7. Use the down arrow button to select DRIVE DIAGNOSTICS.
8. Press SELECT. The list of available tape drives appears.
9. Use the arrow button to select the tape drive to be mounted.
10. Press the SELECT button. The list of drive diagnostic tests appears.
11. Use the arrow button to select MOUNT/DISMOUNT LOOP.