6
6
The examples in this guide will illustrate the textbook mode of entry. The order in which items are entered in textbook mode is the
same in algebraic mode. Only the appearance of the entry is different. However, the order of entry in RPN mode is different. If
you prefer to use RPN, consult the User Guide.
Example
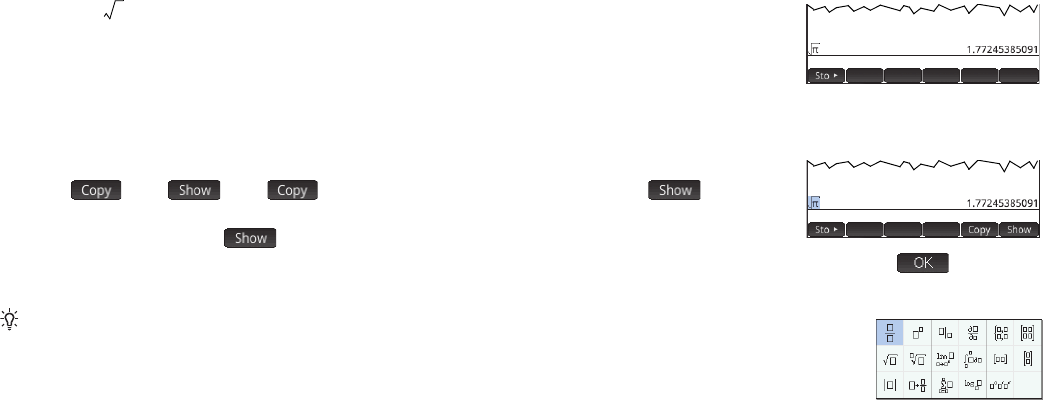
To calculate , enter SjSzE
Notice that both √ and are entered as a key-combination. They are shifted characters.
By default all results are displayed with 12 digits of accuracy. You can also evaluate expressions
using the computer algebra system (CAS) directly, or by calling a CAS command from Home
view. This provides symbolic rather than numeric results (see
page 10).
Press = twice to highlight the expression you entered. Note that two additional menu items
appear: and . The command is described on page 7. The command
is useful if a result is too tall to be seen in its entirety (for example, a many-rowed matrix). If you
highlight the result and tap
, it is displayed in textbook format in full-screen view. In full-
screen view you can press = and \ (as well as >and <) to bring hidden parts of the result into view. Tap to return to
the previous view.
Tip: a quick way to enter many types of mathematical expressions is to press F. A palette of
templates appears (shown at the right). You choose a template by tapping on it and then add the
necessary parameters.
Entering Text
The common alphabetic characters (a–z and A–Z) can be entered from the keyboard. To enter an uppercase alphabetic
character, first press
A and then the key that has that character printed on it in orange. Thus to print F, enter Ak. To enter
a lowercase character, first press
AS and then the key that has that character printed on it in orange. Thus to print f, enter
ASk. There is a way to lock the keyboard so that all subsequent characters are uppercase without needing to be
preceded by
A. The keyboard can also be locked so that every subsequent alphabetic character is lowercase. This is explained
in the User Guide.


