


3-20 Troubleshooting and Diagnostics HP Omnibook XT6050, XT/VT6200
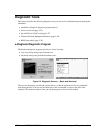
Running e-Diagtools
The following steps describe how to run e-Diagtools. The procedure may differ slightly for different
versions of e-Diagtools.
1.
Restart the computer.
2.
When the HP logo appears, press F10 to start the diagnostic test.
3.
When the menu appears, press Enter to run e-Diagtools.
4.
The first time you run the program, you are prompted to select the language for the program.
5.
Press F2 to proceed with the basic tests.
You can also proceed directly to the advanced tests from this point by pressing Ctrl-F9 (in which
case skip to step 10, below).
6.
When the hardware detection finishes, check the list of detected hardware.
Note
If a device is not detected or fails its test, it might be configured incorrectly in the notebook’s
BIOS. You can confirm this by running BIOS Setup and checking the settings—see “BIOS Setup
Utility” on page 3-29.
7.
Run the basic test.
Press F2 to start the basic hardware test.
8.
To exit without running the advanced tests, press F4 to view the Support Ticket. Press F3 to exit.
9.
Optional: Run the advanced tests
. Press F2 to open the advanced test screen.
10.
Select and run the appropriate tests. Note that individual tests do not appear if the hardware they
test is not detected. Press the following keys to run tests:
Enter Runs the highlighted test.
F5 or Space Marks/unmarks the highlighted test.
F6 Marks/unmarks all tests in the current menu.
F7 Marks/unmarks all tests in all menus.
F10 Runs all marked tests.
(Press F9 for a list of all function keys.)
If a test fails, the error code and description are logged, and the error code is displayed
temporarily. If several errors occur, look for patterns that might indicate a common cause.
11.
Save the Support Ticket.
Press T to update and display a Support Ticket containing system and
test information.
12.
When you are finished running tests, press Esc to exit the advanced tests.
13.
Optional:
To save the Support Ticket to a floppy disk, press F7 then Alt+C.
14.
Exit.
Press F3 and then any key to exit and restart the notebook.
15.
Optional: Open the Support Ticket.
In Windows, click Start, Programs (or All Programs),
Hewlett-Packard, Notebook, HP e-DiagTools, e-DiagTools for Windows.
16.
Click View to display the Support Ticket.
17.
To add information about the problem, click Comments and type the information, then click OK.