


Technology Code ID) Troubleshooting and Diagnostics 3-23
Running e-DiagTools
1. Restart the notebook: click Start, Turn Off Computer, Restart.
2. When the HP logo appears, press F10 to start the diagnostic test.
3. When the menu appears, press F2 to run e–DiagTools.
The first time you run the program, you are prompted to select the language for the program.
4. When the Configuration Description appears, verify the list of detected hardware.
Note
If a device is not detected or fails its test, it might be configured incorrectly in BIOS. You can
confirm this by running the BIOS configuration utility and checking the settings—see “BIOS
Configuration Utility” on page 3-27.
5. Run the basic test. Press F2 to start the basic hardware test. The results appear when the test is
complete.
You can also proceed directly to the advanced tests from this point by pressing Ctrl-F9 (in which
case skip to step 10, below). ??still true??
If the basic test fails, you can press F6 and start a Wizard that runs a set of advanced tests for the
failed component. Then generate a support ticket. ??still true??
6.
Optional: Run the advanced tests. Press F2 to open the advanced test screen.
7. Use the arrow keys and ENTER to select the tests that you want to run. Tests are listed only for
detected hardware.
If a test fails, the error code and description are logged, and the error code is displayed
temporarily. If several errors occur, look for patterns that might indicate a common cause.
8. Press F2 to run the selected tests and add the results to the Support Ticket.
9. Press F12 to run the selected tests in a loop until you press ESC. When running advanced tests in
a loop, ESC does not stop all tests immediately.
10. After each run, press F2 to go back to the advanced tests screen, press F4 to view the support
ticket, or press F3 to exit.
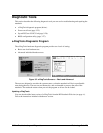
Viewing the support ticket
1. In Windows, click Start, All Programs, Hewlett-Packard, Notebook, HP e–DiagTools, e–
DiagTools for Windows.
2. Click View to display the Support Ticket.
3. To add information about your problem, click Comments and type the information, then click OK.
To save or print the Support Ticket, click Save As or Print.