


Technology Code ID) Troubleshooting and Diagnostics 3-27
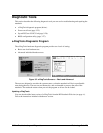
BIOS Configuration Utility
The BIOS configuration utility provides access to basic system settings. It is independent of the
operating system.
Running the BIOS configuration utility
1. Restart the notebook.
2. When the HP logo appears, press F2 to enter the BIOS configuration utility.
3. The pointing devices are not active in the BIOS configuration utility, so you will need to use the
keyboard to navigate:
• Press the left and right arrow keys to move among menus.
• Press the up and down arrow keys to move among parameters in a menu.
• Press Enter to open the dialog for the current parameter, or to select the parameter.
• Press Tab or the left and right arrow keys to move among selections in a dialog.
• Press the up and down arrow keys to move through values for the setting.
• Press Enter to close the dialog and accept the settings.
4. After you select the options you want, use the Exit menu to exit the utility.
Table 3-5. BIOS Configuration Menus and Parameters
Pavilion zt1000/xz300 and Omnibook xt1500: Settings for BIOS version IB.M1.00 (Spring 2002).
Main Menu Description Default
BIOS Revision Shows the current BIOS version. Detected
automatically.
Service ID (Born On
Date)
Displays an identifier used for repair service. Detected
automatically.
Serial Number Displays the serial number as shown on the back of the unit. Detected
automatically.
UUID Number Displays the value of the 16-byte UUID (Universally Unique
ID) as 32 hex characters.
Detected
automatically.
Platform Branding ID Displays the product family. Detected
automatically.
System Time Sets the time using 24-hour format. Values set take effect
immediately.
System Date Sets the date using dd/mm/yy format (except English, which
uses mm/dd/yy format).
Internal Hard Disk Sets the hard disk drive type and various parameters. Detected
automatically.
Extended Memory Shows the extended memory size. Detected
automatically.
LCD Status Panel
Display
Sets whether the status panel on the front of the notebook is
enabled.
Enabled
LCD Status Panel Date
Format
Sets the date format for the status panel. mm/dd/yy
LCD Status Panel Time
Format
Sets the time format for the status panel. hh:mm AM/PM