


Quick Start
User’s Manual 44
Document Number: 320264
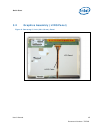
Note: VGA output is provided by using the ADD2N card on the SDVO port.
The following steps are optional depending on the user’s needs:
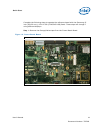
1. Attach the Mott Canyon 4 MDC to the MDC header at J9E2 and J9E3. An Intel®
HD Audio card can be piggybacked onto the Mott Canyon 4 card to provide soft
audio and soft modem functionality. Adapter cables, speakers, or a phone line for
a modem may be needed, depending on the specific card used.
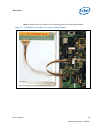
2. Attach a desktop CD-ROM (or mobile CD-ROM with adapter) with cable to
connector J4J3 (red stripe toward pin 1). Attach a power cable to connector J3J1
or from an ATX power supply. If two IDE devices are used on the same channel,
one must be set to master and one must be set to slave. Check the operating
instructions for the IDE devices.
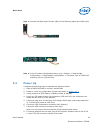
3. If desired, connect a USB floppy to one of the USB connectors.
Powering Up the Board
1. Press the power button located at SW3J1.
2. As the system boots, press F2 on the keyboard to enter the Firmware setup
screen.
3. Check time, date, and configuration settings. For most users the default settings
should be sufficient for the initial bring-up.
4. Press F10 to save and exit the Firmware setup.
5. The system reboots and is ready for use.
Note: If the board does not power up completely, the Port 80 code on the 7-segment
displays (CR7B2 and CR7B3) may provide insight into the issue.
Powering Down the Board
There are three options for powering-down the Crown Beach CRB:
1. Use OS-controlled shutdown through the Windows Start menu (or equivalent)
2. Press the power button on the motherboard at SW3J1 to begin power-down.
3. If the system is hung, it is possible to asynchronously shut the system down by
holding the power button down continuously for 4 seconds.
Note: Intel does not recommend powering down the board by shutting off power at the ATX
power supply.