


56 ADVANCED SCANNING
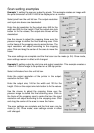
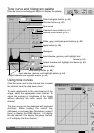
Example 1: setting the scanner output by pixels. This example creates an image with
the pixel dimension of 640 X 480 to be displayed on a monitor.
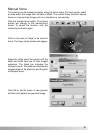
Select pixel from the unit list box. The output-resolution
and input-size boxes are deselected.
Enter the dpi resolution for the output size; 640 for the
width and 480 for the height. Click the output-size lock
button to fix the values; the output-size boxes will be
deselected.
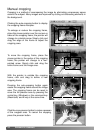
Use the mouse to adjust the cropping frame over the
prescan image to define the final scanning area. Click
on the frame of the cropping area to resize the box. The
input resolution will adjust according to the cropping
area. Click and drag the center of the area to move the
frame.
The scan settings are complete and the final scan can be made (p. 34). Once made,
scan settings remain in effect until changed.
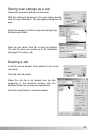
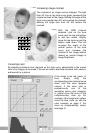
Example 2: setting output by print size and output resolution. This example creates a
148mm X 100mm image to be printed on a 300 dpi printer.
Select millimeters from the unit list box.
Enter the output resolution of the printer in the output-
resolution list box: 300.
Enter the output size; 148 for the width and 100 for the
height. Click on the output-size lock button to fix the values.
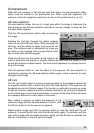
Use the mouse to adjust the cropping frame over the
prescan image to define the final scanning area. Click on
the frame of the cropping area to resize the box; the input
resolution will adjust according to the cropping area. Click
and drag the center of the area to move the frame.
The scan settings are complete and the final scan can be
made (p. 34). Once made, scan settings remain in effect
until changed.
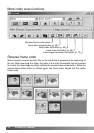
Scan setting examples