


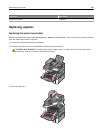

Erasing volatile memory
The volatile memory (RAM) installed on your printer requires a power source to retain information. To erase the
buffered data, simply power down the device.
Erasing non‑volatile memory
• Individual settings, device and network settings, security settings, and embedded solutions—Erase information
and settings by selecting Wipe All Settings in the Configuration menu.
• Fax data—Erase fax settings and data by selecting Wipe All Settings in the Configuration menu.
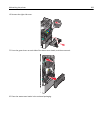
1 Turn off the printer.
2 Hold down
2
ABC
and
6
MNO
while turning the printer on. Release the buttons only when the screen with the progress
bar appears.
The printer performs a power-on sequence, and then the Configuration menu appears. When the printer is fully
powered up, the touch screen displays a list of functions, instead of the standard home screen icons.
3 Touch Wipe All Settings.
The printer will reboot several times during this process.
Note: Wipe All Settings securely removes device settings, solutions, jobs, faxes, and passwords on the printer.
4 Touch Back > Exit Config Menu.
The printer will power‑on reset, and then return to normal operating mode.
Erasing printer hard disk memory
Note: Not all printers have a hard disk installed.
Configuring Disk Wiping in the printer menus enables you to remove residual confidential material left by scan, print,
copy, and fax jobs, by securely overwriting files that have been marked for deletion.
Using the Embedded Web Server
1 From the Embedded Web Server, click Settings > Security > Disk Wiping.
Note: Printers without a hard disk will not display Disk Wiping in the Security menu.
2 For Wiping Mode, select one of the following:
• Auto—Use this to automatically wipe data following each use (can increase the time between jobs).
• Manual—Use this to set up a schedule for disk wiping.
3 Click Submit.
4 From the Security menu, click Disk Wiping.
5 If you have enabled Manual mode and wish to set up a schedule for disk wiping, click Scheduled Disk Wiping.
Notes:
• Scheduled Disk Wiping will not be displayed until after Manual mode has been selected and submitted.
• If you do not wish to schedule disk wiping, you can skip steps 5 and 6.
Securing the printer hard disk and other installed memory 202