


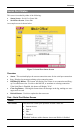
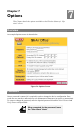


Options
55
DNS (Domain Name Server
•
These entries are optional. The main DNS (Domain Name Server) is either provided by
your ISP, or entered on the Quick Setup screen.
•
If desired, enter any other DNS IP Addresses here. The first available DNS will be used.
NAT (Network Address Translation)
NAT allows PCs on your LAN to share a single external (Internet) IP Address. This IP Address
is supplied by your ISP. Use the following to determine whether or nor you need NAT.
•
For Internet access, NAT
must be left On
unless all PCs on your LAN have valid external
IP Addresses.
•
If this device is not being used to provide shared Internet access, NAT is not normally
required. With NAT disabled, the Wireless Gateway will act as a static router.
•
If NAT is disabled, the Firewall protection provided by the Wireless Gateway is lost, and
the Advanced Internet features (Virtual Servers, Special Applications, and DMZ) are no
longer available.
TFTP
TFTP (Trivial FTP) can be used to upgrade the firmware in the Wireless Gateway. However,
this is not normally required; there is a Windows utility available for this purpose.
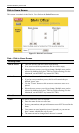
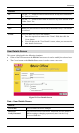
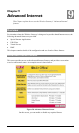
Remote Management
This feature allows you to manage the Wireless Gateway via the Internet.
Enable Remote
Management
Enable to allow management via the Internet. If Disabled, this
device will ignore management connection attempts from the WAN
port.
Port Number
Enter a port number between 1024 and 65535 (8080 is recom-
mended). This port number must be specified when you connect
(see below).
Note:
The default port number for HTTP (Web) connections is port
80, but using port 80 here will prevent the use of a Web "Virtual
Server" on your LAN. (See Advanced Internet - Virtual Servers)
Current IP Address
You must use this IP Address to connect (see below).
This IP Address is allocated by your ISP. But if using a Dynamic IP
Address, this value can change each time you connect to your ISP.
So it is better if your ISP allocates you a Fixed IP Address.
To connect from a remote PC via the Internet
1.
Ensure your Internet connection is established, and start your Web Browser.