


CMG-DCM
5. You now have access to the DCM's console and all of its functions. You
should change your password, if you have not done so already, with the
command passwd
For full details on how you can configure the serial ports of the DCM, see
Section 4.3, “Serial port configuration”.
Connecting over Ethernet
You can use a “crossover” Ethernet cable to connect the DCM directly to your
computer. This has the same effect as connecting the DCM and your computer
to a separate hub using standard Ethernet cables: the two machines will
consitute a network segment, and each will have its own IP address on that
segment. See Section 2.4, “Connecting to a local network” for details on how to
configure TCP/IP on the DCM.
If your computer has two network interfaces, and one is connected to a local
area network, you may be able to set up a network bridge between the DCM's
segment and the rest of the network. For example, if you are using Microsoft
Windows XP:
1. Connect to the DCM's console over a serial link.
2. Because you are connecting the DCM to a single computer, you will
probably not be able to use DHCP. You should configure the DCM to
disable DHCP and use an IP address in a private range such as
192.168.0.x:
gcfgdbset net.eth.0 static
gcfgdbset net.eth.0.address 192.168.0.2
gcfgdbset net.eth.0.netmask 255.255.255.0
Here, 192.168.0.2 should be replaced with the IP address you want
the DCM to use.
Allow a short time for the DCM to reconfigure the network.
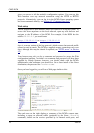
3. On your computer, select Start Control Panel Network→ →
Connections. Right-click on the interface connected to the DCM, and
select Properties.
4. Click on Internet Protocol (TCP/IP), then Properties.
5. Select Use the following IP address, and fill in an address on the same
subnet as the DCM (e.g. 192.168.0.49). Click OK, then OK in the
Connection Properties window.
6. Check that you can connect to the DCM using its new IP address by
12 Issue A