


EN-13
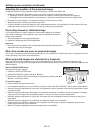
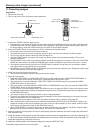
Front projection, ceiling mounting
For ceiling mounting, you need the ceiling mount
kit designed for this projector. Ask a specialist for
installation. For details, consult your dealer.
• Thewarrantyonthisprojectordoesnotcoverany
damage caused by use of any non-recommended
ceiling mount kit or installation of the ceiling mount
kit in an improper location.
• Whenusingtheprojectormountedontheceiling,
set IMAGE REVERSE in the INSTALLATION menu
to MIRROR INVERT. See page 32.
• Whentheprojectorismountedontheceiling,
images may appear darker than those projected in
the case of tabletop mounting. This isn’t a product
malfunction.
• AskyourinstallationspecialisttoprovideanA/C
power switch. When you do not use the projector,
be sure to shut down the main power by the
switch.
• Donotinstalltheprojectorwheretheexhaustvents
are exposed to air emitted by an air conditioning.
Such installation may cause a breakdown.
• Donotinstalltheprojectorneararealarm
because it emits hot air from its exhaust vents.
Caution:
• Installationmustbedonebyaqualied
professional.
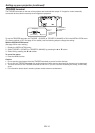
When the projector is installed on the ceiling using
the ceiling mount kit, it is recommended to hold
the mount kit and the projector using a metal bar
or wire in addition to the mount kit fixing screws
to prevent the projector from falling due to an
earthquake or other cause. For that purpose, use
a metal bar, wire, or screw that bears a load of at
least 70 kgf. When using a metal wire, secure one
end to a screw hole marked with an arrow on the
rear terminal panel and the other end to the mount
kit. (Don’t use screw holes without arrow marks.) In
this case, make sure that the screw is inserted in
the projector at least 5 mm. The length of the screw
should be 20 mm or shorter. Also make sure that
no electrical current is flowing in the mount kit due
to current leakage or other cause.
Setting up your projector (continued)
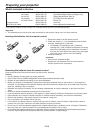
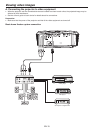
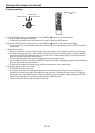
Rear projection
Ask a specialist for installation. For details, consult
your dealer.
• Forrearprojection,setIMAGEREVERSEinthe
INSTALLATION menu to MIRROR. See page 32.
Caution:
• Placingtheprojectordirectlyonacarpetimpairs
ventilation by the fans, causing damage or failure.
Put a hard board under the projector to facilitate
ventilation.
• Placetheprojectoratleast50cm(or20inch)away
from the wall to prevent the intake vents and the
exhaust vents that emit hot air from being blocked.
• Donotusetheprojectorinthefollowinglocations
and manners, which may cause fire or electric
shock.
• Inadustyorhumidplace.
• Inasidewaysposition,orwiththelensfacing
down.
• Nearaheater.
•
In an oily, smoky, or damp place such as a kitchen.
• Indirectsunlight.
• Wherethetemperatureriseshigh,suchasina
closed car.
• Wherethetemperatureislowerthan+41ºF(or
+5ºC)orhigherthan+95ºF(or+35ºC).
• Keepfoliageplantsandpetsawayfromthe
projector. The temperature around the exhaust
vents and that of the cabinet on the top of the
exhaust vents become high. Take special care for
small children.
Important:
•
We don’t recommend using the projector at an
altitude of 1500 meters or higher. Use at an altitude of
1500 meters or higher may affect the projector’s life.