


EN-23
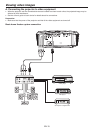
C. Projecting images
Preparation:
• Removethelenscap.
• Turnonthepoweroftheconnectedcomputer.
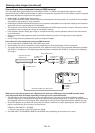
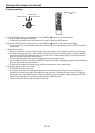
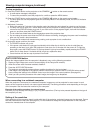
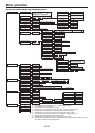
POWER button
ON ( I ) button
COMPUTER/
COMPONENT button
HDMI/COMPUTER button
POWER indicator
STATUS indicator
t, u buttons
1. Confirm the POWER indicator lights-up red.
• Iftheprojectorwasturnedoffbeforethelamphadcooleddownsufciently,thefanmaystartrotatingandthe
POWER button may not work after the power cord is plugged. (The STATUS indicator blinks green.) After the
fan stops rotating, press the POWER button to turn back on the POWER indicator.
2. Press the POWER button on the projector or ON ( I ) button on the remote control.
• Itmaytakeaboutoneminuteforthelamptolightup.
• Thelampfailstolightuponrareoccasions.Insuchacase,waitforafewminutesandthentryagain.
• Donotcoverthelenswiththelenscapwhilethelampison.
• AfterthePOWERbuttonispressed,theimagemayickerbeforethelampbecomesstable.Thisisnota
product malfunction.
• TheSTANDARDlampmodeisactivatedbydefaultwhenevertheprojectoristurnedon.WhentheLOWLAMP
MODE has been chosen, the default STANDARD lamp mode is switched to the LOW lamp mode in 1 minute.
• TheprojectorstartswarmingupwhenthePOWERbuttonispressed.Duringthewarm-upprocess,images
may appear dark and no commands are accepted.
• Byblinkingred,theSTATUSindicatorindicatesthatthelampshouldbereplacedsoon.Replacethelampwhen
the STATUS indicator blinks red. (See page 51.)
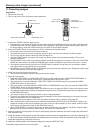
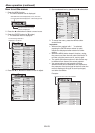
3. Adjust the focus by turning the focus ring.
• Youarerecommendedtoadjustthefocusatthescreencenter.
4. Select an input source.
• PresstheHDMI/COMPUTERbuttonontheprojectorortheCOMPUTER/COMPONENTbuttonontheremote
control to select COMPUTER.
• TheinputsourceisswitchedbetweenCOMPUTER,HDMI1andHDMI2everytimeyoupresstheHDMI/
COMPUTER button on the projector.
• TheinputsourceisswitchedbetweenCOMPUTERandCOMPONENTeverytimeyoupresstheCOMPUTER/
COMPONENT button on the remote control.
• Thoughitmaytakesometimebeforeanimageisdisplayedonthescreendependingonthetypeoftheinput
signal, such symptom is not a malfunction.
• Imagesmaynotbeprojectedinthecorrectposition,dependingonthetypeoftheinputsignal.Insuchacase,
press the AUTO POSITION button. (See page 24.)
• Theprojectorautomaticallyselectstheappropriatesignalformat.(Theselectedsignalformatisdisplayedon
the INFORMATION menu.)
• Youcannotchangetheinputsourcewhilethemenuisbeingdisplayed.
• WhenCOMPUTERischosenasthesource,imagessuppliedfromthecomputermayicker.Pressthet or u
button on the remote control to reduce flicker, if it occurs. (Fine adjustment)
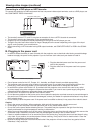
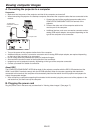
5. Adjust the position of the projector to keep an appropriate projection distance with which images are projected in
their specified sizes.
6. Adjust the position of the projector so that the projector and the screen are perpendicular to each other. (See page
10.)
• When the projector cannot be positioned perpendicularly to the screen, adjust the projection angle. (See page 12.)
7. Adjust the image size by turning the zoom ring.
8. Adjust the vertical position of the displayed image by turning the LENS SHIFT dial.
If necessary, adjust the focus and zoom again.
Viewing computer images (continued)