1-7
M
E
N
U
PJ
ASPECT
OFF
VIDEO
AUTO ADJ.
RGB VIEWER
LASER
ON
3DREFORM
HELP
POINTER
VOLUME MAGNIFY
ZOOM
PIC-MUTE
SLIDE
FOLDER
SLIDE
LIST
E
N
T
E
R
C
A
N
C
E
L
POWER
SELECT
FREEZE
FOCUS
16
21
19
22
27
28
29
17
20
23
25
26
24
1514
12
1110
97
8
5
6
4
18
13
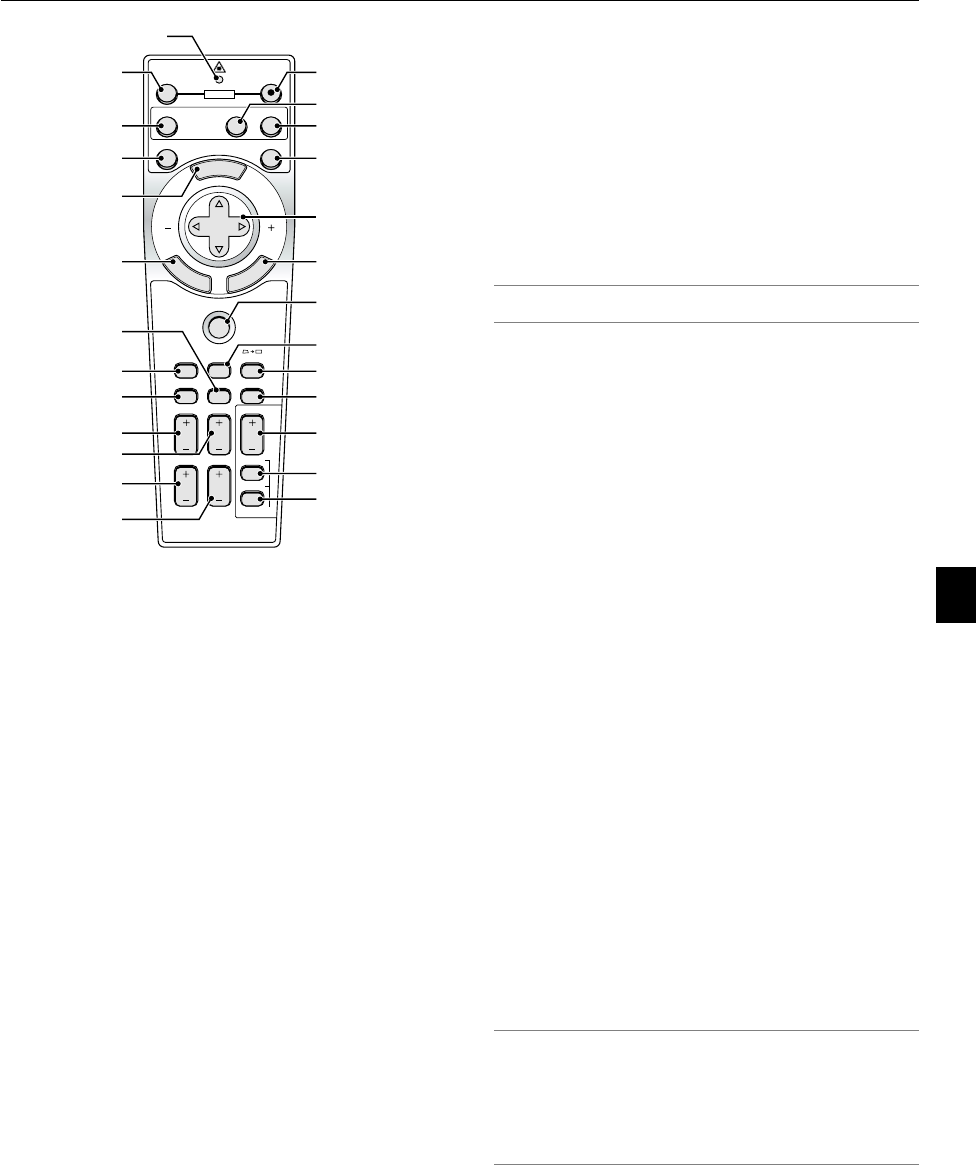
15. CANCEL (Right Click) Button
When you are in the Computer mode, this button works as
the mouse right button. When you are in the Projector mode,
which is indicated by lighting the PJ button: Press this button
to exit the Menus. It works the same way as the CANCEL
button on the cabinet. See page 4-1 for the Computer mode.
16. PJ Button
Press this button to switch the SELECT, CANCEL, and EN-
TER buttons between the Projector mode (lit red) and the Com-
puter mode. Press this button or any one of the POWER ON/
OFF, MENU, ASPECT, 3D REFORM, HELP, POINTER, MAG-
NIFY, VIEWER, FOLDER LIST or SLIDE LIST buttons to switch
to the Projector mode and the PJ button lights red. To switch
back to the Computer mode, press the PJ button again. See
page 4-1.
17. ASPECT Button
Press this button to display the Aspect Ratio select screen.
See page 6-8.
18. FREEZE Button
This button will freeze a picture. Press again to resume mo-
tion.
19. 3D REFORM Button
Press this button to enter 3D Reform to correct the distortion,
and make the image square. See page 6-10. Each time this
button is pressed, the item will change as follows:
Pincushion →Cornerstone → Keystone →... (the three items
are available only when no adjustment is made)
20. HELP Button
Provides the online help or the set information.
21. POINTER Button
Press this button to display pointers; press again to hide the
pointer. You can move your pointer icon to the area you want
on the screen using the Select ̆̄̇̈ button. See page 4-2.
22. PIC-MUTE Button
This button turns off the image and sound for a short period
of time. Press again to restore the image and sound.
NOTE: When the menu is displayed, a press of this button mutes an
image and sound without turning off the menu.
23. VOLUME (+)(–) Button
Press (+) to increase the volume and (–) to decrease it.
24. MAGNIFY (+)(–) Button
Use this button to adjust the image size up to 400%. When
the pointer is displayed, the image is magnified about the cen-
ter of the pointer.
When the image is magnified, the pointer is changed to the
magnifying icon.
When the pointer is not displayed, the image is magnified about
the center of the screen. See page 4-3.
25. ZOOM (+)(–) Button
Reduces the image size between 80% and 100%.
26. FOCUS (+)(–) Button
Adjust the focus.
27. SLIDE (+)(–) Button
Press (+) to select the next folder or slide and (–) to select the
previous folder or slide. See page 5-2.
28. FOLDER LIST Button
Press this button to display a list of folders included in a PC
card. See page 5-2.
29. SLIDE LIST Button
Press this button to display a list of slides included in a PC
card. See page 5-2.
NOTE: The default is the Computer mode, which allows you to use
the SELECT, CANCEL, and ENTER buttons as your computer mouse.
When the POWER ON/OFF, MENU, ASPECT, 3D REFORM, HELP,
POINTER, MAGNIFY, VIEWER, FOLDER LIST, or SLIDE LIST button
is pressed, the PJ button lights red to indicate that you are in the
Projector mode. If no buttons are pressed within 60 seconds, the
light goes out and the Projector mode is canceled.
1. Introduction
