


3-2
3-2. Selecting a Source
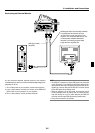
Selecting the computer or video source
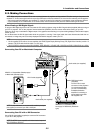
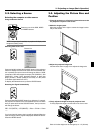
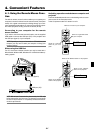
Using the Remote Control
Press any one of the RGB, VIDEO
or VIEWER buttons.
Source List
NOTE: If no input signal is available, the projector will display a blue
background (factory preset).
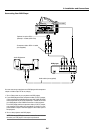
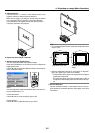
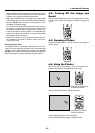
Selecting from Source List
Press and quickly release the SOURCE button on the projector
cabinet to display the Source list. Each time the SOURCE but-
ton is pressed, the input source will change as follows: "RGB"
(computer or DVD with component output),"DVI (DIGITAL)", "DVI
(ANALOG)", "Video" (VCR, document camera, or laser disc
player), S-Video", "Viewer" (slides on a PC card), or "LAN" (wired
or wireless signal aired from a PC).
To display the selected source, press the ENTER button.
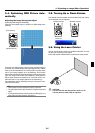
Detecting the Signal Automatically
Press and hold the SOURCE button for a minimum of 1 second,
the projector will search for the next available input source. Each
time you press and hold the SOURCE button, the input source
will change as follows:
RGB→DVI (DIGITAL) → DVI (ANALOG) →Video→ S-Video →Viewer
→ ...
If no input signal is present, the input will be skipped. When the
input source you wish to project is displayed, release the button.
Press the ENTER button.
M
E
N
U
E
N
T
E
R
C
A
N
C
E
L
PJ
OFF
VIDEO
AUTO ADJ.
RGB VIEWER
LASER
ON
SELECT
POWER
MENU
SOURCE
FOCUS
PC CARD
MENU
SOURCE
FOCUS
PC CARD
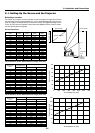
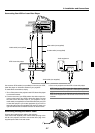
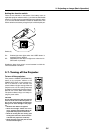
3-3. Adjusting the Picture Size and
Position
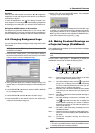
1. Place the projector on a flat level surface and ensure that
the projector is square to the screen.
2. Make the image square
Move the projector left or right to center the image horizon-
tally on the screen.
3. Adjust the projected image size
Use the throw chart on page 2-2 to adjust the image size.
4. Finely adjust the height to keep the projector level
To finely adjust the height, use the feet on the front or rear.
Each of the feet height can be changed up to 1.2" (30 mm).
3. Projecting an Image (Basic Operation)
up down