


Installing the Passport 4400 Passport 4400 Hardware Installation Manual
2-3
Unpacking the 4400
Procedure 1: Unpacking the 4400
1. Read the labels on the box, then open the box.
Note: Make sure that you keep the packing list included. It contains model
numbers and information about the Passport 4400 unit and all included
modules.
2. Remove the shipping material and any modules shipped in the box along
with the Passport 4400 unit. Place these modules on a table near the instal-
lation site.
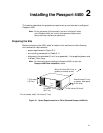
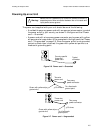
3. Slowly ease the Passport 4400 unit out of the carton by firmly gripping its
sides and lifting straight up.
Note: Be sure to use proper lifting technique when removing the
Passport 4400 unit from the carton. Do not bend over at the back
when lifting.
4. Place the equipment out on a table close to the installation site.
5. Check the packing list against the contents. Report any damage to the
shipping carrier.
6. Save the packing materials in case you need to move the unit.
Once the carton is unpacked, verify that you have received all the equipment you
have ordered.
Passport 4400 Rack Installation
The Passport 4400 may be installed in a rack using an available Passport 4400
rackmount kit. Please consult 800-1959-20, Passport 4400 Ordering Catalog, for
model numbers and ordering information.
In addition to the rackmount shelf, each kit contains the following parts:
• Four screws
• Four washers — nylon filler
• Four washers — nickel finish
• Four clip nuts.
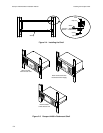
Procedure 2: Passport 4400 Rack Installation
1. Install the clip nuts on the rack.
2. Place the shelf in the rack.
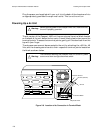
3. Secure both sides of the shelf to the rack, using the provided screws and
washers (see Figure 2-4).
4. Position the unit on the rackmount shelf from the rear. Place the front of the
unit through the cutout in the front of the rackmount shelf (see Figure 2-5).