


1. Remove the upper cover and pull roller assembly.
2. Move the change lever to the rear paper feed position.
3. Rotate the platen.
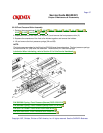
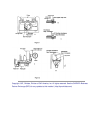
4. Set the gap change gear (Figure 1 A) to Range 2 by turning the adjust screw using a small phillips
screwdriver. Turn this screw slowly while moving the carriage (1) to the left (if turning the screw
counter clockwise) or (2) to the right (if turning the screw clockwise). This will allow easier rotation of
the gears and prevent the gears from being stripped.
DO NOT DISENGAGE THE ADJUST GEAR!
5. Remove the ribbon protector.
Printhead Gap Modification Phase
6. Slide the carriage assembly to the left side of the platen.
7. Check the printhead gap. Use a 0.014 inch or 0.35 mm feeler gauge. The printhead gap must
measure 0.014 +/- 0.001 inch (0.35 +/- 0.03 mm).
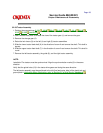
8. Use a large, straightened paper clip (Figure 1 B) to push down on the adjust gear. This will disengage
the adjust gear from idle gear D.
9. Use a small phillips screwdriver to turn the adjust screw. (Figure 1 C)
Turning the screw CLOCKWISE will increase the printhead gap.
Turning the screw COUNTERCLOCKWISE will decrease the gap.
10. Slide the carriage assembly to the right side of the platen.
Parallel Adjustment Phase
11. Check the printhead gap at the right side of the platen.
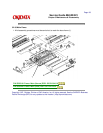
12. If the gap measurements are different between the left and right positions, turn the adjust cam as
follows. (Figure 2 B)
Turning the cam CLOCKWISE will increase the printhead gap.
Turning the cam COUNTERCLOCKWISE will decrease the printhead gap.
Verification Phase
13. Check the printhead gap adjustment at the left, right, and center of the platen.
14. If the printhead gap is not the same at all three positions, return to step 6.