


4 – Installation
Installing a Switch
59021-05 A 4-3
Installing a SANbox2-16 switch involves the following steps:
1. Mount the switch.
2. Install SFP transceivers.
3. Connect the switch to the AC power source.
4. Connect the management workstation to the switch.
5. Install the SANbox Manager application.
6. Configure the switch.
7. Configure the ports.
8. Cable devices to the switch.
4.2.1
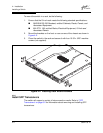
Mount the Switch
The switch can be placed on a flat surface and stacked or mounted in a 19” EIA
rack. The top of each chassis has dimples to receive the rubber feet of a second
chassis stacked on top. Without the rubber feet, the switch occupies 1U of space
in an EIA rack. Mounting rails are required and available through QLogic
Corporation.
WARNING!!
Mount switches in the rack so that the weight is distributed
evenly. An unevenly loaded rack can become unstable possibly
resulting in equipment damage or personal injury.
CAUTION!
If the switch is mounted in a closed or multi-unit rack assembly,
make sure that the operating temperature inside the rack
enclosure does not exceed the maximum rated ambient
temperature. Refer to ”Switch Environmental” on page A-4.
The switch must rest on rails or a shelf in the rack or cabinet.
Allow 16 cm (6.5 in) minimum clearance at the front and rear of
the rack for service access and ventilation.
Do not restrict chassis air flow. Allow 16 cm (6.5 in) minimum
clearance at the front and rear of the rack for service access and
ventilation.
Multiple rack-mounted units connected to the AC supply circuit
may overload that circuit or overload the AC supply wiring.
Consider the power source capacity and the total power usage
of all switches on the circuit. Refer to ”Switch Electrical” on
page A-3.
Reliable grounding in the rack must be maintained from the
switch chassis to the AC power source.