


1–Product Overview
Installing the QLogic Adapter vCenter Plug-in for ESX/ESXi
SN0054671-00 B 1-15
Starting the QLogic Adapter vCenter Plug-in
To start the QLogic Adapter vCenter Plug-in:
1. Start the VMware vSphere Client and connect to the vCenter Server by
entering the IP address or name, user name, and password.
2. Click Login.
3. If the Security Warning dialog box appears, click Ignore to use the current
SSL certificate.
If you start and connect the vSphere Client directly to an ESX/ESXi
server, the vCenter plug-in does not open.
If you have not already done so, create a data center and add the ESX
server.
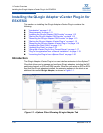
4. In the left pane, select the IP address of the VMware server.
5. In the right pane, click the QLogic Adapter tab to view the Web page.
The vCenter plug-in retrieves the adapter information from the server.
Removing the QLogic Adapter vCenter Plug-in
To remove the QLogic Adapter vCenter Plug-in:
1. In the Windows Control Panel, select Add or Remove Programs.
2. In the Add or Remove Programs dialog box, select the QLogic Adapter
vCenter Plug-in, and then click Change/Remove.
3. Follow the instructions in the QLogic Adapter vCenter Plug-in installer to
remove the plug-in.
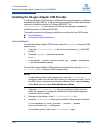
Installing the Flash Utility
For ESX, before you perform a Flash update on QLogic Adapters using the
QLogic Adapter vCenter Plug-in, ensure that the QLflash utility is also installed on
the ESX system.
To install the QLflash utility on ESX:
1. Unzip the esx_qlflash.zip file, which contains the qlflash
userworld executable.
2. Copy the QLflash binary file to the /usr/lib/vmware/bin/ directory.
NOTE:
If the server does not have the QLogic Adapter CIM Provider and
adapters installed, or if the vCenter Plug-in installation and registration
was not successful, the QLogic Adapter tab is not shown.