


56 PARAGON II USER GUIDE
Associating a Target with a Power Outlet
Since Paragon II cannot determine the type of device through a power outlet connection,
associations of targets with individual power outlets must be done manually.
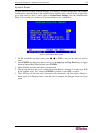
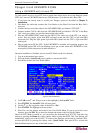
1. Press F5 to select the “Administration Menu” and select option 3, “Channel Configuration”
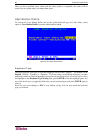
2. Highlight the connected power strip and press G to enter the “Outlet Configuration” Menu.
The outlet number corresponds to the number under the “Ch. ID” column.
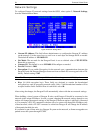
3. Under the “Type” column, highlight an outlet and press Enter to configure the device type:
A. PWR: This is the default association type and refers to devices not connected to the
Paragon II system (a router or a monitor).
B. CPU: Select this type for all devices connected to the Paragon II system (including “non-
server” targets such as UMT switches).
4. Press the right arrow to highlight the name field then press Enter to configure the name of a
target associated with that outlet.
A. If the type is set to PWR, users will be able to change the name of the device as desired.
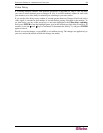
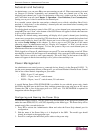
B. If the type is set to CPU, the OSD will request you to save changes (“Y/N/ESC”), then
display a “Select Powered Device” menu. This is an alphabetized list of all devices
connected to the Paragon II system, allowing the user to indicate which target is powered
by the newly configured outlet.
5. Highlight the desired device and press Enter . The selected target will be automatically
associated with that power outlet. The outlet name will be the name of the target server.
Press S to save the configuration.
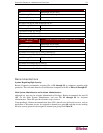
6. Press the right arrow key to scroll to the next page of the configuration menu for setting
security groups for a power outlet. See Group Settings, earlier in this chapter for more
information on setting access rights. This allows administrators to limit who is authorized to
control power to various targets. The default setting for each group on that outlet is “- -“,
which means no access to any user other than the Admin user. Note, once a group ID setting
is changed, it can never return to the original “- -“ state.
Controlling Power to an Outlet
The addition of a power strip to the Paragon II system allows administrators to control the power
to targets in two ways:
Controlling power from the Server Selection Menu:
Normal Paragon II operation involves browsing the list of devices in the OSUI and pressing
Enter to switch to that target. By pressing F3 instead of Enter when a target is highlighted,
Paragon II will check that target for Power Strip associations:
• If Paragon II does not detect any associations with that target, a message indicating ”No
Outlets / Access Denied” appears, and the action is cancelled.
• If the target has associated power outlets, but the user is not authorized to control those
outlets, a ”No Outlets / Access Denied” message will appear and the action will be cancelled.
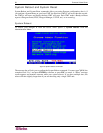
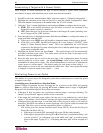
• If Paragon II sees that this target is associated with at least one power outlet, it will switch to
that target. The OSUI will remain on-screen, displaying a list of power outlets associated with
the target. This allows users to see the target before power is cycled to it.
− You will be given four choices from this menu: Power Off (X), Power On (O), Recycle
Power (R), and Select All (A)
If the target is powered OFF, pressing O will power ON the outlet instantly.
If the target is powered ON, pressing X or R will activate a confirmation dialog “Are
you sure (yes/no)?” As a safeguard, type in the whole word “yes”, to confirm cutting
power to the target. Typing in “y,” or anything other than “yes” will be accepted as a
“no.”