


SITE PLANNING
ULTRAMATRIX “UMX” SERIES INSTALLATION AND OPERATIONS MANUAL
9
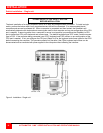
Site planning
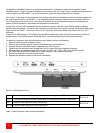
Organizing your site and planning the placement of the computers, the KVM stations, the UltraMatrix switches, and
the routing of the cables is a key part in the installation and configuration process. Care should be taken when
connecting the computers, KVMs, and the UltraMatrix switches. Locate the UltraMatrix as close as possible to the
computers so the cables are as short as possible but still give some freedom of movement. Using shorter cables
keeps the video noise to a minimum and reduces installation costs. Provide proper strain relief for all cables.
The UltraMatrix switch can be rack mounted with Rose Electronics rack mount kit (see Appendix I & J). Another
option that makes for a clutter free installation is the Rose Electronics RackView™. The RackView is a complete
KVM station (keyboard, LCD monitor, and mouse) all in a compact, pullout drawer that fits in 1 or 2 rack units. The
RackView can also be ordered with an optional UltraMatrix switch installed.
If your installation will consist of accessing your computers/servers remotely using Rose Electronics CrystalView
CAT5 or Fiber KVM extender or accessing over your Ethernet network or dial-up using our UltraLink, route these
cables carefully and plan the placement of these products.
Wherever the UltraMatrix is located, it should be on a secure surface, free from obstructions and objects that may
cause damage to the Unit or an individual.
Following are a few items to consider prior to installing or configuring the UltraMatrix switch:
Determine which UltraMatrix switch will be Unit #1, #2, #3, etc.
Determine which computer will be connected to CPU port #1, #2, #3, etc.
Identify the computers that do not use a PC2 type keyboard and a PS/2 mouse (default settings). Before
connecting these computers to a CPU port, the CPU port must be pre-configured to change the default keyboard
and mouse types to the correct types.
Each computer can be assigned a unique computer name. Names like staff, marketing, and finance make it easy
to identify and connect to.
The default computer names are Computer x (x = 1 – 1,000)
The KVM stations can also be assigned a unique KVM name.
The default KVM names are KVM x (x = 1 – 4)
Access to the system set-up and configuration menus can be limited by assigning a configuration password.
Access to the computers can be limited by assigning each user a unique user ID and password and configuring
the switch to require a login.
Pre-plan the expansion cable routing for expanded systems.
The configuration of the system, computers, KVM stations, users, profiles, and groups are defined in the menu
section.