


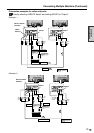


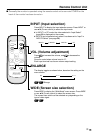

25
US
Connection
and Installation
■ The wall-mount bracket is assembled for perpendicular installation, so to use it for tilted installation,
please follow the procedure below to set it at the installation angle.
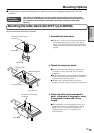
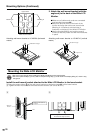
Setting the angle of the wall-mount bracket
Installation angle:
LC-M3700 (Horizontal mount) 0° to 20°
LC-M3710 (Vertical mount) 0°
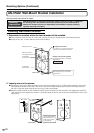
Attaching wall-mount bracket to the monitor
Terminal cover
Wide LCD Monitor
Temporary stand
Table
Soft cloth, etc.
Screws
(4 locations)
Wall-mount bracket
Setting the installation angle.
1 Remove the 2 vertical installation screws. These
screws are used when setting the angle in step
3.
2 Assemble the wall-mount bracket as desired as
shown in the figure. (Figure shows a 20˚ angle.)
3 Use the screws removed in Step 1 (M6 15 mm
length × 2 screws) and the included screws M6
15 mm length × 2 screws to loosely fasten the
angle-setup bracket with 4 screws. Firmly
tighten these 4 screws after the angle-setup
bracket position has been determined.
• When setting the angle of the wall-mount bracket,
be careful not to pinch your fingers, etc.
Caution
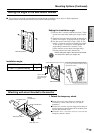
1. Detach the temporary stand.
●Place the monitor (face down) on a table, etc.
covered by a thick, soft cloth for LCD panel
protection.
●Position the monitor near the edge of the table so
that the temporary stand does not hit the table, then
remove the terminal cover.
●Unfasten the 4 screws used to secure the
temporary stand in place.
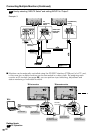
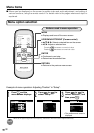
Mounting Options (Continued)
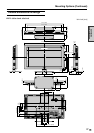
5˚
10˚
15˚
20˚
As the screw hole numbers become larger
(5, 10,15, 20), the Wide LCD Monitor will be
tipped farther forward.
Install so that the
angle-setup bracket
spacers are facing
inward.
Wall-mount bracket
Angle setup bracket (2 units)
Screws M6 15mm length (4 screws)