


35
User Management
Users - Adding Users (continued )
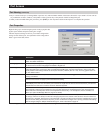
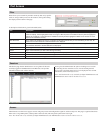
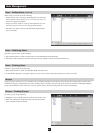
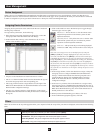
3. Enter the information for the user that you are adding. A description of each of the fields is given in the table below:
Field Description
Username Enter a username with a minimum of 6 and a maximum of 16 characters.
Password Enter a password with a minimum of 8 and a maximum of 16 characters.
Confirm Password Re-enter the password. The two entries must match, or you will not be able to save the new user profile.
Description Enter any additional information you might have to describe the user; this field is optional.
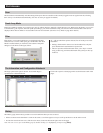
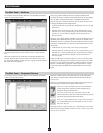
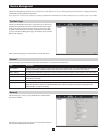
Type There are three categories: Super Administrator, Administrator and User. There is no limitation on the number of
accounts that can be created in each category, only a limit on the total number of accounts. You can have a total of 64
user accounts.
• Super Administrators have access to all aspects of the B064-Series KVM Switch. They can change any and all
settings, create/modify Users and Groups, access all connected devices and features of the unit.
• Administrators have access to user management settings*, and can access both Windows and Java Clients. They can
only access ports and devices that are assigned to them by a Super Administrator. They are also allowed to configure
the B064-Series KVM Switch settings and access the Log Server only if the Super Administrator gives them
permission.
• Users can access the ports and devices assigned to them by a Super Administrator or Administrator*. Users can
be given permission to configure the B064-Series KVM Switch settings and access the Log Server by a Super
Administrator or Administrator. They cannot be give permission to access the User Management section of the OSD.
*When assigning port access rights to a User, Administrators can only assign access to the ports they have been given
permission to by a Super Administrator. (For example, if an Administrator does not have access to port 6, they can not
assign access rights for port 6)
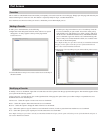
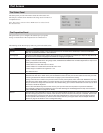
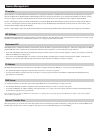
Permissions Super Administrators and Administrators automatically have Windows Client and Java Client permissions. Permissions
and restrictions for ordinary users are set individually by checking the appropriate boxes.
• Windows Client allows a user to access the KVM via the AP Windows Client software. This or the AP Java Client
software is needed in the event the Super Administrator disables access to the KVM switch via web browser.
• Java Client allows a user to access the KVM via the browser and non-browser-based Java Clients. If a user does not
have access to Java, they will not be able to connect via browser.
• View Only limits a user to only being able to view the display of connected devices they are given access to. They
cannot control port access, nor can they input any keyboard or mouse signals to the devices they view.
• Force to Grayscale forces the user’s view of the remote display to be in grayscale. This can speed up keyboard and
mouse response time in low bandwidth situations.
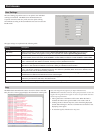
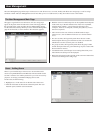
Status Status allows you to control the user’s account and access to the installation, as follows:
• Disable Account lets you suspend a user’s account without actually deleting it, so that it can be enabled again in the
future without re-creating it.
• Account Never Expires – Select this option if you want the user account to be active for an indefinite amount of time.
• Account Expires On – Select this option if you want to set an expiration date for the user account.
• User Must Change Password at Next Login – Select this option to require a user to change his password the next time
they log in. This can be used by the administrator to give the user a temporary password to log in for the first time, and
then let the user set the password of his choice for future logins.
• User Cannot Change Password – Select this option to force the user to use a password of your choosing.
• Password Never Expires – Select this option if you want the user to use the assigned password for an indefinite period
of time.
• Password Expires After – Select this option if you want the users password to expire after a period of time, forcing
them to change their password.
4. When you have selected the desired account settings, click Save.
5. An Operation Succeeded popup appears. Click OK.
6. Click Users in the List panel to return to the main screen. The new user appears both in the list and the main panel.