


68
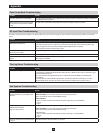
General Operation Troubleshooting
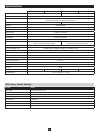
Administration Troubleshooting
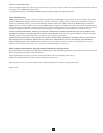
AP Windows Client Troubleshooting
Problem Action
Erratic Operation Reset the unit by pressing and holding the Reset button on the front of the unit for longer than three
seconds.
I can’t access the B064-Series KVM
Switch, even though I have specified the
IP address and port number correctly.
If the B064-Series KVM Switch is behind a router, the router’s Port Forwarding (also referred to as
Virtual Server) feature must be configured.
Mouse and/or Keyboard not responding. • If accessing the KVM via local console, unplug and replug the cable(s) from the console port(s).
• Turn the connected computer/server off and then back on. All connected devices need to be powered
off when connecting to the KVM.
Sudden loss of network connection. Close your B064-Series KVM Switch connection. Wait approximately 30 seconds, and log in again.
No video display on the remote console. • Make sure the resolution of the monitor being used to display the remote computer/server is higher
than that of the remote computer/server.
• Make sure the OSD toolbar is closed. Sometimes mouse movement is required to bring the screen out
of sleep mode. If the OSD toolbar is open, your mouse input is not being received by the remote
computer/server.
When logging in from a browser, the
following message appears: 404
Object Not Found.
If a login string has been set, make sure to include the forward slash and correct login string when you
specify the B064-Series KVM Switch IP address.
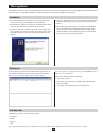
When I log in, the browser generates a
CA Root certificate is not trusted, or a
Certificate Error response.
The certificate can be trusted. (See Trusted Certificates page 15 for details)
There are two mouse pointers after the
remote system is accessed.
The KVM automatically defaults to show both the local and remote mouse pointers. You can choose to
display both mouse pointers at the same time or only the remote mouse pointer. (See Mouse Pointer
Type on page 23 for details.)
The display on the remote console is
distorted and performing an Autosync
doesn’t resolve the problem.
• Switch ports to a port with a different resolution and then switch back.
• Lower the resolution and refresh rate for the computer/server connected to the port.
I can log in with my Username and
Password from a remote location, but
cannot log in from the Local Console.
The Local Console only supports logins for usernames and passwords that contain the following
characters: A – Z, 0 – 9, and Space. If your Username or Password contains characters other than
these, you will not be able to log in from the Local Console.
Problem Action
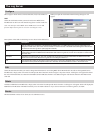
After upgrading the firmware and
logging back in, the B064-Series KVM
Switch appears to still be using the old
firmware version.
Clear your browser’s cache. Delete all temporary internet files and cookies. Close the browser and
reopen it to log in with a new session.
Problem Action
Windows Client won’t connect to the
B064-Series KVM Switch.
DirectX 7.0 or higher must be installed on your computer.
Remote mouse pointer is out of sync. • Perform a Video Auto Sync. (See Video Settings on pages 20-21 for details) This will most often sync
the local and remote mouse pointers.
• Use the Adjust Mouse Hotkey command. (See Adjust mouse on page 19 for details)
• If this does not work, see Manual Mouse Synchronization on page 23.
Part of remote window is off my monitor. • If Keep Screen Size is not enabled (see Screen Options on page 19), try performing a Video Auto
Sync (see Video Settings on pages 20-21) to sync the local and remote monitors. If this does not work,
you may have to manually adjust the Screen Position in the Video Settings screen.
• If Keep Screen Size is enabled, areas that are off the screen can be accessed by positioning the
mouse pointer on the far side of the area you want to scroll to.
The remote screen is rotated 90 degrees. Enable Keep Screen Size. (See Control Panel Configuration on page 19)
I cannot run Net Meeting when the
Windows Client is running.
Enable Keep Screen Size. (See Control Panel Configuration on page 19)
Appendix