Operating the Printer
3255 4073–002 2–9
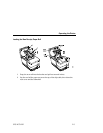
1. Insert the check from the front, face up, with the MICR characters to the
right, as shown.
2. Slide the check toward the back of the printer along the right side until it
covers both sensors.
The Slip In LED turns on when both sensors are covered, indicating that the
check is inserted properly. The printer reads the magnetic characters on the
check.
Note: Do not hold or keep the check from moving during the MICR
check reader transaction or the check numbers will not be
read accurately.
3. Follow any instructions from the host computer.
Once the check has been verified, the printer may then print the date,
payee, and amount on the check, depending on the host computer software.
For more information, see “Printing on Slips and Checks” on the next page.
4. Remove the check after it has been fed all the way back out.
5. Follow the instructions from the host computer to finish the transaction, if
provided.
6. To validate the check, follow the procedures in “Validating Slips and
Checks” later in this section.


