


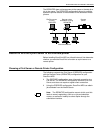


DOCUPRINT NPS ON A NOVELL NETWORK
D-8 XEROX DOCUPRINT NETWORK PRINTER SERIES INSTALLATION PLANNING GUIDE FOR MODELS 96/4635/180 NPS
— Define the printer per the naming convention
suggested by NPS.
— Select DEFINED ELSEWHERE.
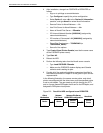
— From the Print Server window, configure a printer for
PSERVER using the Printer Configuration option.
— Type any name (for example, Gazette) for the printer.
Select Remote Other/Unknown type for the printer and
save the information.
— Define the printer in the Queue Service by highlighting the
printer name (for example, Gazette) and pressing Enter.
— Press the Insert key to select the Print Queue (for
example, Gazette) you want to bind with PSERVER (for
example, PGazette).
— Save the information.
• When configuring NPS, answer the configuration questions as
follows:
— Remote Printer for Novell Netware -- <N>.
— Use Print Server for Novell Netware -- <Y>.
— Name of Novell Print Server -- PGazette.
— IPX Internal Network Number [000000##] (assigned by
network administrator).
— IPX number of Connected LAN [000000##] (assigned by
network administrator).
— Token Ring Framing type -- TOKENRING (or
TOKENRING_SNAP).
• After installation, change from PSERVER to RPRINTER as
follows:
— Sign on to privilege as an administrator.
— Type Configure to specify the printer configuration.
— Select Option 3, enter <N> to the Review All Information
question, and type Novell to review Novell information.
— Remote Printer for Novell Netware -- <N>.
— Use Print Server for Novell Netware -- <N>.
— Name of Novell Print Server -- PGazette.
— IPX Internal Network Number [000000##] (assigned by
network administrator).
— IPX number of Connected LAN [000000##] (assigned by
network administrator).
— Token Ring Framing type -- TOKENRING (or
TOKENRING_SNAP).
— Save all of the options.
• Type Start All.
• Reboot the NPS.
• Provide all of the required installation parameters identified in
the checklist provided in Chapter 2 of this guide to your service
representative.