


Submitting print jobs from Quick Print for Windows NT 4.0
Guide to Submitting Jobs from the Client 6-17
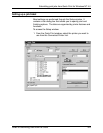
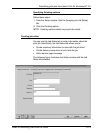
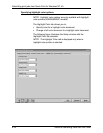
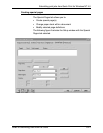
Specifying custom paper stock
Follow these steps:
1. From the Setup window, click the [Paper Stocks] tab.
2. Click a stock entry from the Stocks list box.
3. Click the appropriate paper size from the Size list box. If you
click Custom, type in the paper width and length and click
[OK]. The maximum and minimum values for width and
length are displayed in the dialog box.
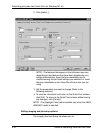
4. Click Custom from the Stock Type list box.
5. Type a custom identification name up to 30 characters in the
Type text box.
NOTE: Specifying “plain” as a custom paper type will result
in a blank Media Type on the printer controller.
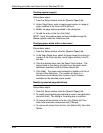
6. Click the appropriate color from the Color list box. If you click
Custom, type in a color name up to 30 characters and click
[OK].
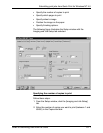
7. Click the check box if the paper stock is drilled.
8. If displayed, type the paper weight.