


22 PA/PT400 & PA/PT 403 User’s Guide
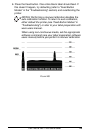
Printing a Test Label
Before you connect the printer to your computer or portable data
terminal, make sure that the printer is in proper working order. You
can do this by printing a configuration label (refer to “Feed Button
Modes” in “Troubleshooting”). If you can’t get this label to print, refer to
“Troubleshooting”.
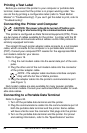
Connecting the Printer and Computer
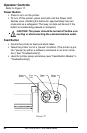
CAUTION. The power should be turned off before con-
necting or disconnecting the communications cable.
This printer is configured as Data Terminal Equipment (DTE). There
are two types of cables available for the printer. A printer with the IR
option can also communicate without cables via the IrDA protocol to
similarly equipped terminals.
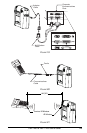
The straight through printer adapter cable connects to a null modem
cable, which connects to the computer or a portable data terminal
(PDT). Consult your computer/PDT reseller for the appropriate DB-9
null modem cable for your device.
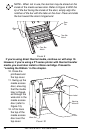
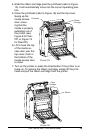
Refer to Figure 19.
1 . Plug the null modem cable into the serial data port of the com-
puter.
2. Plug the other end of the null modem cable into the connector
of the printer adapter cable.
NOTE.- The adapter cable maintains interface compati-
bility with the full line of Zebra printers.
3. Plug the adapter cable into the printer’s communications port
(see Figure 1).
Null modem cables are also available for many popular portable
data terminal models. Consult your authorized Zebra reseller for avail-
able data cables.
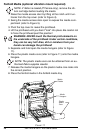
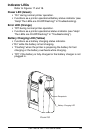
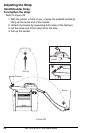
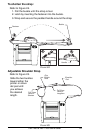
Connecting to a Portable Data Terminal
Refer to Figure 20.
1. Turn off the portable data terminal and the printer.
2. Plug the communications cable into the communications port of
both the portable data terminal and the printer. Some cables
will have a ferrite near the connector that plugs into the printer.
3. Turn on the portable data terminal and the printer. For pinout
and cabling information, refer to the “Specifications” section.