


PA/PT400 & PA/PT 403 User’s Guide 37
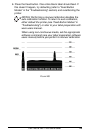
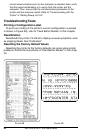
Communications Diagnostics
If there’s a problem transferring data between the computer and the
printer, try putting the printer in the Communications Diagnostics
mode. The printer will print the ASCII characters and their respective
hexadecimal values for any data received from the host computer
(see Figure 29). To find out how, refer to “Feed Button Modes” in this
chapter.
Feed Button Modes
Power Off Mode (Communications Diagnostics Mode)
With the printer power off, press and hold the Feed button while you turn on the
power. The printer prints out a listing of its current configuration (see Figure 28).
After printing the label, the printer will automatically enter a diagnostic mode in
which the printer prints out a literal representation (see Figure 29) of all data
subsequently received.
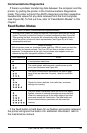
Power On Modes
With the printer power on, printhead closed, and Error LED off, press and hold the
Feed button for several seconds. The Error LED will flash a number of times in
sequence. The explanation at the right (Action) shows what happens when you
release the key after the specific number of flashes.
Flash Sequence Action
The media sensor calibrates and a media sensor profile
prints (see Calibration and Figure 25).
A configuration label prints.
The serial communication parameters are reset to 9600
baud, 8 bits per character, no parity, l stop bit, and XON/
XOFF.
Resets the factory defaults, auto calibrates, and saves
settings into memory.
The print width is calibrating. While the Error LED rapidly
flashes, a series of stacking rectangles prints on the label.
When the rectangle prints to the outer edges of the label,
press and release the Feed button. The label width and
current communication parameters will be saved into
memory.
If the Feed button is held down for six flashes and quickly released,
the printer will ignore the button. For additional information, refer to
the maintenance manual.